How to use Zapier to Automate your Client Onboarding: A Step-by-Step Guide

By Ema Katiraee, Systems Strategist
TL;DR: When a contract is signed in Dubsado, a Zap can automatically create a Google Drive folder, set sharing permissions, copy template documents, create a Gmail label, update Airtable records, block time in Google Calendar, and tag the client in Kit. Here's how to set it up step by step.
If you're using Dubsado and other tools like Google Drive, Airtable, or Kit alongside it, Zapier is what connects them. Instead of manually creating folders, updating records, and organizing emails every time a new client signs on, you can set it up once and let it run automatically.
Here's a step-by-step walkthrough of a Zap that triggers when a contract is signed in Dubsado and handles the rest for you.
What is Zapier?
Zapier is an automation tool that connects your apps and lets you create automated workflows called Zaps. When something happens in one app, it triggers an action in another, without you having to do anything manually.
Step 1: Trigger the Zap When a Contract is Signed in Dubsado
The journey begins in Dubsado. Once a client signs a contract, this action triggers the Zap.
With Dubsado's integration with Zapier, you can use this contract signing as the starting point for a series of automated tasks that streamline your entire onboarding process.
Setting Up the Trigger: In Zapier, select Dubsado as the app and choose “Contract Signed” as the trigger event. This setup ensures that whenever a contract is signed, the Zap is initiated, kicking off the automated onboarding process.
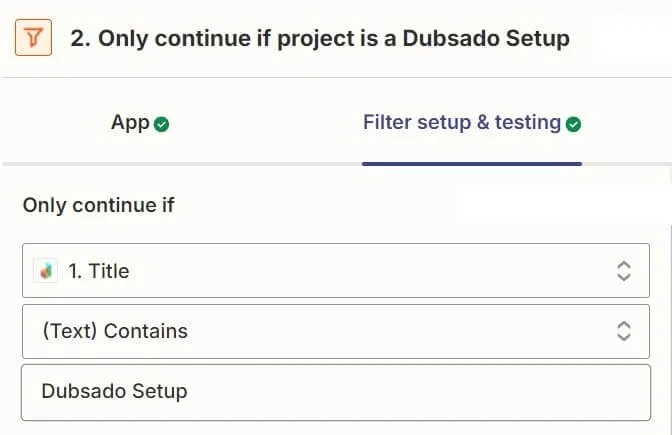
Step 2: Filter the Zap to Run for Specific Contracts
Not every contract requires the same set of onboarding tasks. For example, a client signing up for a full-service package might need a different onboarding process compared to a client opting for a consulting session.
To ensure that the Zap only runs for relevant contracts, you can set up a filter in Zapier based on specific criteria, like the title of the contract.
Set up the Filter:
App to Use: Filter by Zapier
Filter Setup: Only continue if the title (this is the title of the contract in Dubsado) contains “Dubsado Setup”
This ensures that the automation only continues if the contract meets these conditions, allowing you to tailor the onboarding process to different client needs.

Step 3: Format the Date and Time
When a contract is signed, the date and time are often captured in a format that includes a timestamp, such as: 2024-07-22T17:34:26.772Z.
For organizational purposes, a simpler format like YYYY-MM-DD is often more practical. Zapier’s Formatter tool can automatically reformat the date to make it more user-friendly.
Reformat the Date with Formatter by Zapier:
Event to Use: “Date/Time”
In Action:
Transform: format
Input: select the project date from Dubsado
To Format: choose the output format of YYYY-MM-DD

Step 4: Create a Project Folder in Google Drive
Organizing your client’s project is so much easier with a dedicated folder in Google Drive. This folder will serve as the central location for all project-related documents, ensuring that everything is easily accessible. This step ensures that each client has a uniquely named folder, which is automatically created as soon as the contract is signed.
Create a Google Drive Folder:
Event to Use: “Create Folder”
In Action:
Parent folder: where to place the folder inside of
Folder name: Name the folder using dynamic fields that include the client’s name from Dubsado and the project’s start date from the Formatter step, so you can have a project folder titled: “[Client Name] - [Start Date] Project”.
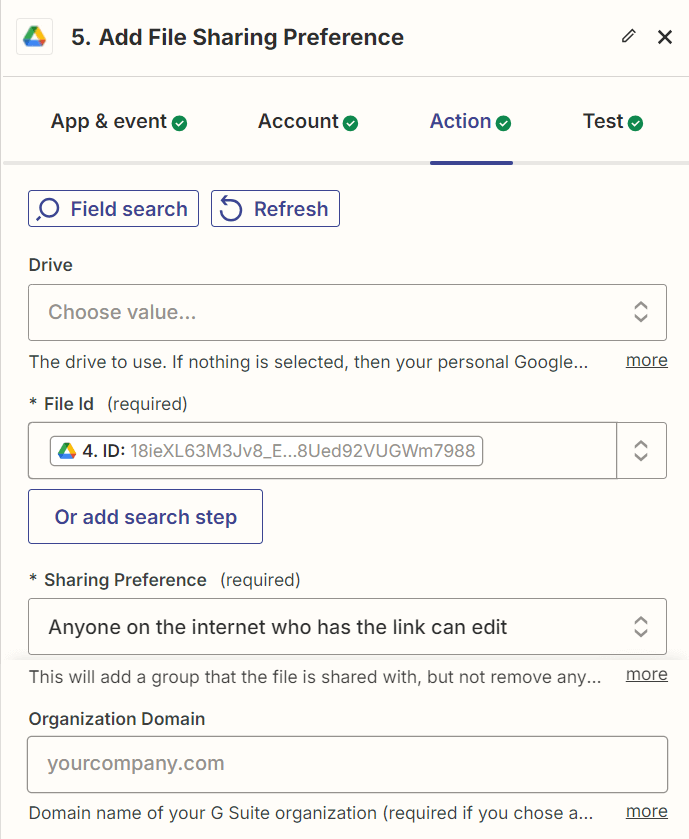
Step 5: Add File Sharing Preferences
Once the project folder is created, it’s important to set up the correct sharing permissions so your clients can view and possibly edit the folder or upload content.
Automating this ensures that everyone who needs access to the folder gets it without delay, and that they won’t have to reach out and ask you for access to view / edit / upload files.
Set Sharing Preferences for a Google Drive Folder:
Event to Use: “Add File Sharing Preferences”
In Action:
File ID: use the file ID of the folder that was created in the previous step
Sharing preference: Specify what level of access they should have (e.g., anyone on the internet who has the link can edit, anyone on the internet with the link can view, a specific email address).

Step 6: Create Subfolders Within the Main Project Folder
To keep the project organized, you’ll want to create subfolders within the main project folder. These subfolders can be used to categorize different types of documents and files, like images or brand files.
Create a Google Drive Sub-Folder:
Event to Use: “Create Folder”
In Action:
Parent folder: use the ID of the parent folder that was created in step 4
Folder name: use a fixed title or a dynamic title pulling information from previous steps.
You can create as many subfolders as needed, ensuring that all documents are organized and easy to find. Automating this step saves time and maintains consistency across all client projects.

Step 7: Find a Document in Google Drive
Templates are essential for maintaining consistency in your processes. If you have a standard document that you use for onboarding, Zapier can automatically find it in your Google Drive. This automation step eliminates the need to manually search for the document each time a new client signs a contract.
Locate a Document in Google Drive: This action will search for the specific template inside of your Google Drive based on its name or keywords.
Event to Use: “Find a File”
In Action:
Filename: select the keywords that Zapier will search for inside of your Google Drive folders
Folder: select the folder inside of which to search
File types: select which type of files to search for (images, documents, audio files, etc.)

Step 8: Copy the Document to the Client’s Folder
After locating the template, you’ll want to customize it for the client by renaming it and placing it in their project folder. This step ensures that each client has their personalized set of documents, ready to go and that all necessary documents are in the right place.
Copy the Document in Google Drive:
Event to Use: “Copy File”
In Action:
File: use the ID of the previous step, so it copies the file that was located.
File Name: use dynamic fields to rename the copied document with the client’s name.
Folder: use the ID of the folder or subfolder that you want to place the document inside of.

Step 9: Create a Label in Gmail
Keeping track of all email communications with a client is crucial. By creating a Gmail label with the client’s name, you can easily organize and retrieve all correspondence related to that client.
Create a Label in Gmail:
Event to Use: “Create Label”
In Action:
Set the name of the folder/label. Name the label after the client using dynamic fields from the trigger.

Step 10: Send an Email with Links to the Folder and Documents
Sending an email with links to the client’s folders and documents ensures that you have all the necessary information at your fingertips without manually copying and pasting links.
Sending the Email with Email by Zapier:
Event to Use: “Send Outbound Email”
In Action:
Set the recipient email address
Set a title for the email
Inside the body of the email, include all the links to the project folders, subfolders, and key documents. Note: the link that your client can access is titled “alternate link” for all Google files.
Including these links in the email makes it easy to add them to Dubsado’s custom-mapped fields to share with clients via email or inside of forms.

Step 11: Add the Client to Airtable
To keep your client database up-to-date, you’ll want to add the new client to your Airtable database. Automating this process ensures that all relevant details are captured as soon as the contract is signed.
Adding the Client to Airtable:
Event to Use: “Create Record”
In Action:
Select the base
Select the table
Fill in the fields in Airtable using dynamic fields from Dubsado (like name, email, date they signed the contract, project start date, etc.)

Step 12: Find the Clients info in Airtable
If you track your leads in Airtable, you’ll want to update the client’s status once they’ve signed the contract. This helps you maintain an accurate view of your sales pipeline and ensures that your leads table reflects the latest developments.
In order to do this, the first step is to find that clients record in Airtable.
Updating Client info in Airtable
Event to Use: “Find Record”
In Action:
Select the base
Select the table
Search by field: email (or you can use another field that is available in your table)
Search value: use the email dynamic field from the contract trigger
Search for Exact Match? Yes

Step 13: Update the Clients info in Airtable
Once the client is located, the next step in this zap is to update that record.
Event to Use: “Update Record”
In Action:
Select the base
Select the table
Select the record: use the ID from the previous step in this Zap - you’ll find it in the custom records in the dropdown
Update the field that you need to in Airtable. In this case, I updated the status of the lead to “Booked” to indicate that they’ve transitioned from a lead to an active client.
This update keeps your sales funnel organized and provides a clear overview of your client’s journey from lead to booking.
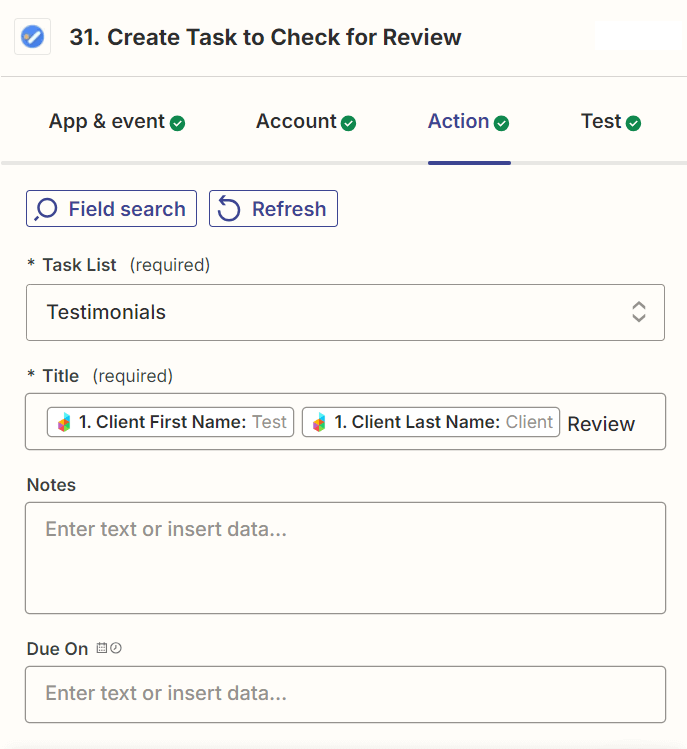
Step 14: Create a Task in Google Tasks
Following up with clients after the project is complete is essential for maintaining a positive relationship. Creating a task reminder in Google Tasks ensures that you don’t forget to reach out for feedback after the project is finished.
Creating the Task in Google Tasks
Event to Use: “Create Task”
In Action:
Select the task list (like boards in Trello)
Set the title of the task - you can use fixed and/or dynamic fields to complete this
You can choose to set a due date
This automation helps you stay on top of client follow-ups, which can be crucial for building long-term relationships and gathering testimonials.
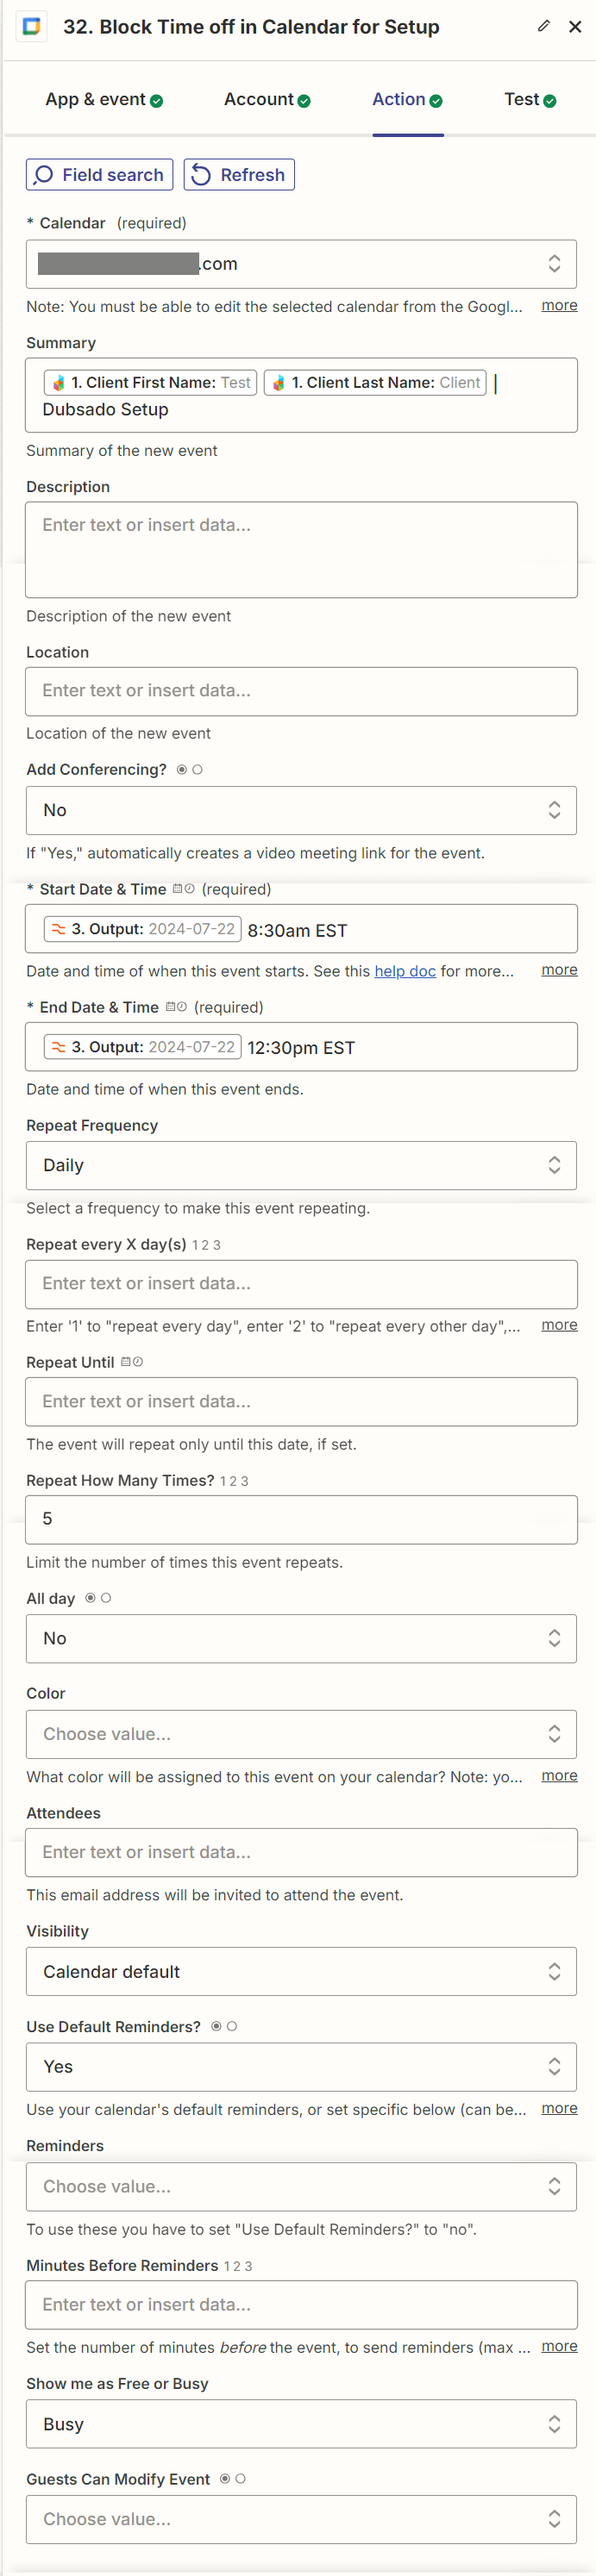
Step 15: Block Time in Google Calendar
Managing your time effectively is key when handling multiple client projects. By blocking off time in Google Calendar starting from the client’s project start date, you ensure that you have dedicated time to focus on delivering excellent service.
Blocking Time in Google Calendar:
Event to Use: “Create Detailed Event”
In Action:
Select the calendar you want to create the event inside of
Create title or summary for the event (this is what you see in your calendar).
For the start date & time, select the project start date and manually input the start time.
For the end date & time, select the project start date and manually input the end time
Select the repeat frequency to daily
Select how many times you want to repeat this time block - I used 5 to block of time from Monday to Friday.
Set the time as free or busy
This step ensures that you have the time you need to focus on the client’s work, reducing the risk of overbooking or overlooking important tasks.


Step 16 & 17: Find and Tag the Client in Kit (formerly ConvertKit)
Tagging clients correctly in Kit allows you to segment your audience and send targeted communications based on their relationship with you, ensuring your messages are relevant.
Find Client in Kit
Event to Use: “Find Subscriber”
In Action: Use the client’s email address to locate their subscriber info.
If the client has been found, then the zap will continue to the next step.
Tag Client in Kit
Event to Use: “Add Tag to Subscriber”
In Action:
Tag: select an existing tag from your list in Kit
Email: use the email that was found in the previous step of the zap
Tutorial: How to use Zapier to Automate your Client Onboarding
If you'd rather follow along visually, I recorded a step-by-step walkthrough of this entire Zap on YouTube. It covers each step in detail so you can set it up alongside the video.
Want Your Dubsado Setup Built Properly?
As part of a done-for-you Dubsado setup, Zapier integrations are available as an add-on if you want to connect Dubsado to other tools in your business like Google Drive, Airtable, or Kit. Book a discovery call and let's talk about what makes sense for your setup.
