How to Create Workflows in Dubsado

What are Dubsado workflows?
Workflows are the most powerful feature inside of Dubsado. They are a way of automating your client process, allowing you to send proposals, contracts, invoices, forms, emails and more automatically.
They allow you to trigger a series of tasks with the click of a single button.
What are the benefits of using workflows?
They automate your client process, allowing you to save A LOT of time on backend tasks every time you have a new project or client. You put in the work on the front end to lay it all out and set it all up inside of Dubsado and then let it do the work for you.
They help free up your mental space because once the workflow is built, you know that certain tasks will get done without your intervention, allowing you to focus on other things in your business without fearing that things will get missed.
How create a workflow in Dubsado
I’ve written out the steps that I follow to create workflows - not everyone will follow these exact steps but they work well for me and how my brain works when organizing things.
The very first time you go through these steps, it will take a while. But the good news is that once it’s done, any future updates will likely only need small tweaks.
1 - Map out your Client Process
Use a Google Doc, or paper/pencil or whiteboard - whatever works for you.
Start by writing out your existing client process. This is a brain dump of the steps you’re taking clients through that work for you already.
To that list, also add the steps you’ve wanted to implement inside or your clients process - but haven’t been able to yet.
I like to lay out each individual task inside of a sequential(ish - as much as you can) bullet point document.
Consider all of the following points (these are just to help guide you, you may have less steps or many more steps in your current process which is not a problem):
Where are people learning about you and your services, where are your leads coming from? For example: Google search, social media, etc.
How are they booking a call or contacting you? For example: your scheduler, a contact form on your site, etc.
Where are your discovery calls happening or how are they booking your services? For example: Your discovery calls take place over Zoom, they are booking you using a checkout on your website, etc.
After that initial call - what is the next step? Do you send a proposal or an email with specifics about your offer? Or do you take payment over the phone during the call?
When they express an interest in becoming your client, what happens then? Do you send them a proposal? Do you send them a contract? When do you invoice them? What systems are you using for these steps?
Do you send your client an onboarding email or package? What is included? Is it a pdf, an email, a form?
Write it all down and don’t worry too much about what it looks like - this is an exercise to get it all out of your head.
Also, don’t worry to much about whether it will all be possible inside of Dubsado. It’s important to get clear about what you want to deliver. The pieces that can’t be done in Dubsado might be possible using other software like Zapier. And some of these items might end up on a to-do list to tackle in the future.
2 - Include Timings and Triggers
Add the timing of when steps should occur or if they occur after a certain task or trigger - for example: 2 days after email is sent, immediately after contract is signed, etc.
Get specific about when you’d like steps to happen and see if certain steps can be combined to make it easier for your client and for you.
Think of things like:
When they agree to their proposal, does the contract get sent after an hour?
When they pay the invoice, should the welcome email go out immediately?
When they fill out the questionnaire, do they get an email the following day with their next steps?
3 - Break it up into Phases
Look for natural phases that are occurring inside of your client process.
Is there an:
Inquiry phase?
Onboarding phase?
Offboarding phase?
It’s important to identify these different phases because they will likely be separate workflows when it’s all built inside of Dubsado.
4 - Make a List of all the Content
Once you’ve mapped out your client process and all the details have been added, you’ll have a very clear picture of what content you’ll need to create in Dubsado.
Go through the steps you’ve written down and make a list of all the templates you will need to build in Dubsado, such as:
Schedulers
Contracts
Questionnaires
Proposals
Lead Capture Forms
Canned Emails
Packages
Payment Plans
5 - Create all the Templates in Dubsado
With the list from step 4, begin building all of the content in Dubsado.
This step will take time.
You may have to come back to this step once you’re building your workflow in Dubsado - it happens to me often that I realize that I’m missing a confirmation email or another detail when I’m building the workflow. It’s not a problem.
6 - Build the Workflow in Dubsado
Once all the different pieces are built inside of Dubsado, you can now start building your workflow(s)!
Using the list of actions available inside of Dubsado PLUS when the action should happen, you have a large number of combinations possible to create a workflow that matches the client process you mapped out.
Actions
Change Project Status
Add Tag
Send Email
Send Form
Create Todo
Send Contract
Send Primary Invoice
Create Invoice
Activate Portal
Deactive Portal
Pause Workflow
Hold Actions Until
Send Appointment Scheduler
Start A Workflow
Archive Project
When
After workflow started
Before project start date
After project start date
Before project end date
After project end date
After form is completed
After invoice is paid in full
After contract signed by client
After all previous actions complete
After an appointment is scheduled
Before an appointment start time
After an appointment has ended
After form is not completed


The end result can look a million different ways. To give you an idea, below is an example of a workflow built in Dubsado.
When I add this workflow to a project (which is already in Dubsado after they’ve filled out a lead capture form on my website), I have the ability to make slight changes to the email that sends the proposal to them.
After that, the system will send them reminders if they have not submitted their proposal in a number of days.
There are hold actions at the end of this workflow to make sure they do not move into the next workflow until they have signed the contract and paid their invoice.

7 - Enhance with Zapier (optional)
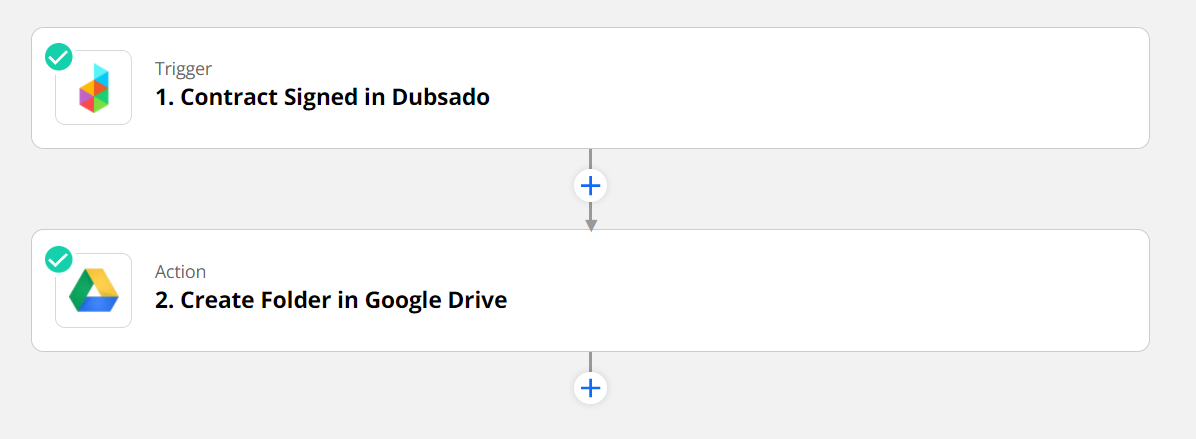
If there are any steps you cannot implement using Dubsado workflows, you could build those steps with Zapier. It allows you to perform any number of tasks in other software based on a specific trigger inside of Dubsado.
For example, when my client signs their contract in Dubsado, Zapier will create a Google Drive folder for their project. This way there is a centralized location for them to upload content that I need to build their Dubsado setup.
It’s not a task that takes too much time - but it’s one less thing to do and one less thing to have to remember to do.
8 - Test your Workflow
Test, test and then test some more!
A lot of the small errors and missing pieces of your workflow will become evident as you test it.
Create a test client and test project using an alternate or personal email address to play the part of the client. This way you’ll see everything your clients will see as they work with you PLUS everything you’ll see as the business owner, and go through the entire workflow seeing both perspectives.
It’s a great way to make sure that everything is working and small details like typos or design details can be fixed before you start using the workflow with your clients.
And… Done 🎉
You now have an automated client process you can deliver over and over again to your new clients!! This will allow you to save SO much time and free up mental space.
Knowing that you’ve mapped out your client process in detail, set it up in Dubsado and tested it, means that you don’t have to worry about forgetting steps when you work with clients.
Need help with your Dubsado setup?
Need someone to help you build all the workflows you need in Dubsado? I can help you with my Dubsado Setup Service.
To learn more about how I can help you, book a free discovery call where we’ll talk about what you need help with, what you’d like to see happen for each new clients and we’ll decide if we’re a good fit to work together.
