How to Create a Professional Email Signature

Last Updated October 2025
You can create a professional email signature by designing one in Canva (image-based), using a free email signature maker like Si.gnatu.re or HubSpot (HTML-based), or generating custom HTML code with ChatGPT. Once created, you can add your signature in Gmail, Outlook, Dubsado, or any other platform through the settings menu.
A professional email signature is a small detail that makes a big difference. It helps you look polished, makes it easier for people to contact you, and can even bring more visitors to your website and social media accounts.
The best part is you do not need to be a designer to create one. There are free tools that let you build a signature in just a few minutes. You can then use it in Gmail, Dubsado, Outlook, or any other platform.
In this guide, you will learn:
What to include in an email signature
How to create an email signature with Canva
How to use email signature maker
How to generate your email signature with ChatGPT
How to install your email signature in Gmail and Dubsado
Best practices for email signatures
Why You Need an Email Signature
A polished email signature is more than just a sign-off. It’s part of your brand identity. It helps you:
Look professional: A clean design shows you care about details.
Make contact easy: Include your email, phone, and website so people can reach you quickly.
Stay on brand: Match your colors, fonts, and logo for a consistent look.
Promote strategically: Add a link to book a call, visit your portfolio, or follow your social accounts.
Think of it as your digital business card that appears automatically in every email.
What to Include in an Email Signature
Keep it short, simple, and useful. The essentials are:
Your Name and Title: Add your full name and role.
Business Name and Logo or Headshot: Use your company logo for branding or a headshot for a personal touch.
Contact Information: Include your email, phone number, and website.
Social Media Links: Add clickable icons for platforms where you are active.
Call to Action (Optional): A single action you want people to take, like “Book a free consultation.”
Legal Disclaimer (Optional): If required for your industry, include a short disclaimer like “This email is confidential and intended only for the recipient.”
How to Create an Email Signature with Canva
Canva is one of the easiest ways to design a branded Gmail signature or Outlook signature.
Steps to create your signature in Canva:
Search for ‘Email Signature’ under Canva templates.
Pick a design you like and edit it with your name, title, logo, and brand colors.
Add icons for social media under ‘Elements’ (search for Facebook, Instagram, LinkedIn, etc.).
Download your design as a PNG or JPG.
Compress the file with TinyPNG so it loads faster.
Upload the image to your Google Drive or to your website and copy the link to the image.
⚠️ Note: Canva designs are image-based. You can only add one clickable link, so this method is more visual than functional.

Canva email signature template

Edited Canva email signature
How to Add a Canva Email Signature in Gmail
Go to Settings → See all Settings.
In General, scroll to Signature.
Click ‘+ Create New’ and add a name.
Click Insert Image, and add the image link OR select from Google Drive.
Choose when it appears (new emails, replies, or both).
Scroll down and click Save changes.
Send yourself a test email to make sure everything looks correct.
How to Add a Canva Email Signature in Dubsado
Go to Template → Canned Emails → ‘Signature’.
Under the formatting options, click the image icon to insert an image.
Select your image or drag + drop it into the box.
Click the image and select ‘Change Size’ if you need to resize. 400px width works well.
Click the image and select ‘Insert Link’ icon. Add a link to your website or booking page. Check the ‘Open in a new tab’ option. Click ‘Insert’ when done.
To check what your signature looks like, send yourself an email using a test project.
Best Free Email Signature Makers
Email signature makers create HTML code so every element inside the signature is clickable. This is the best option if you want people to click your website, or social links.
I’ve tested many free email signature generators and some can be really disappointing. They have beautiful templates but after signing up you find out that those options are only for paid accounts. What you have access to in a free account is limited.
Below, I’m sharing a few that have worked for me and my clients.
Si.gnatu.re
Visit Si.gnatu.re
Click ‘Create a Signature’ and start customizing your template.
Contact: Add your details (name, title), you profile picture (or selfie), your contact details (email, phone, website, address). You can add footer/disclaimer text.
Images: Add your logo and adjust its size or upload a banner, keeping in mind the maximum width limit.
Socials: Add links to relevant social platforms (they have an impressive list)
Design: Change the layout of your signature, adjust the font style and size, and customize the colors and style of the social icons.
Once satisfied with the design, click ‘Finish Editing’.
Click ‘Copy HTML’. A pop-up will appear letting you know that the code was copied to your clipboard. ⚠️ Note: to add your email signature to Gmail, you’ll need to pay $5.00 (one time) to upgrade and install.
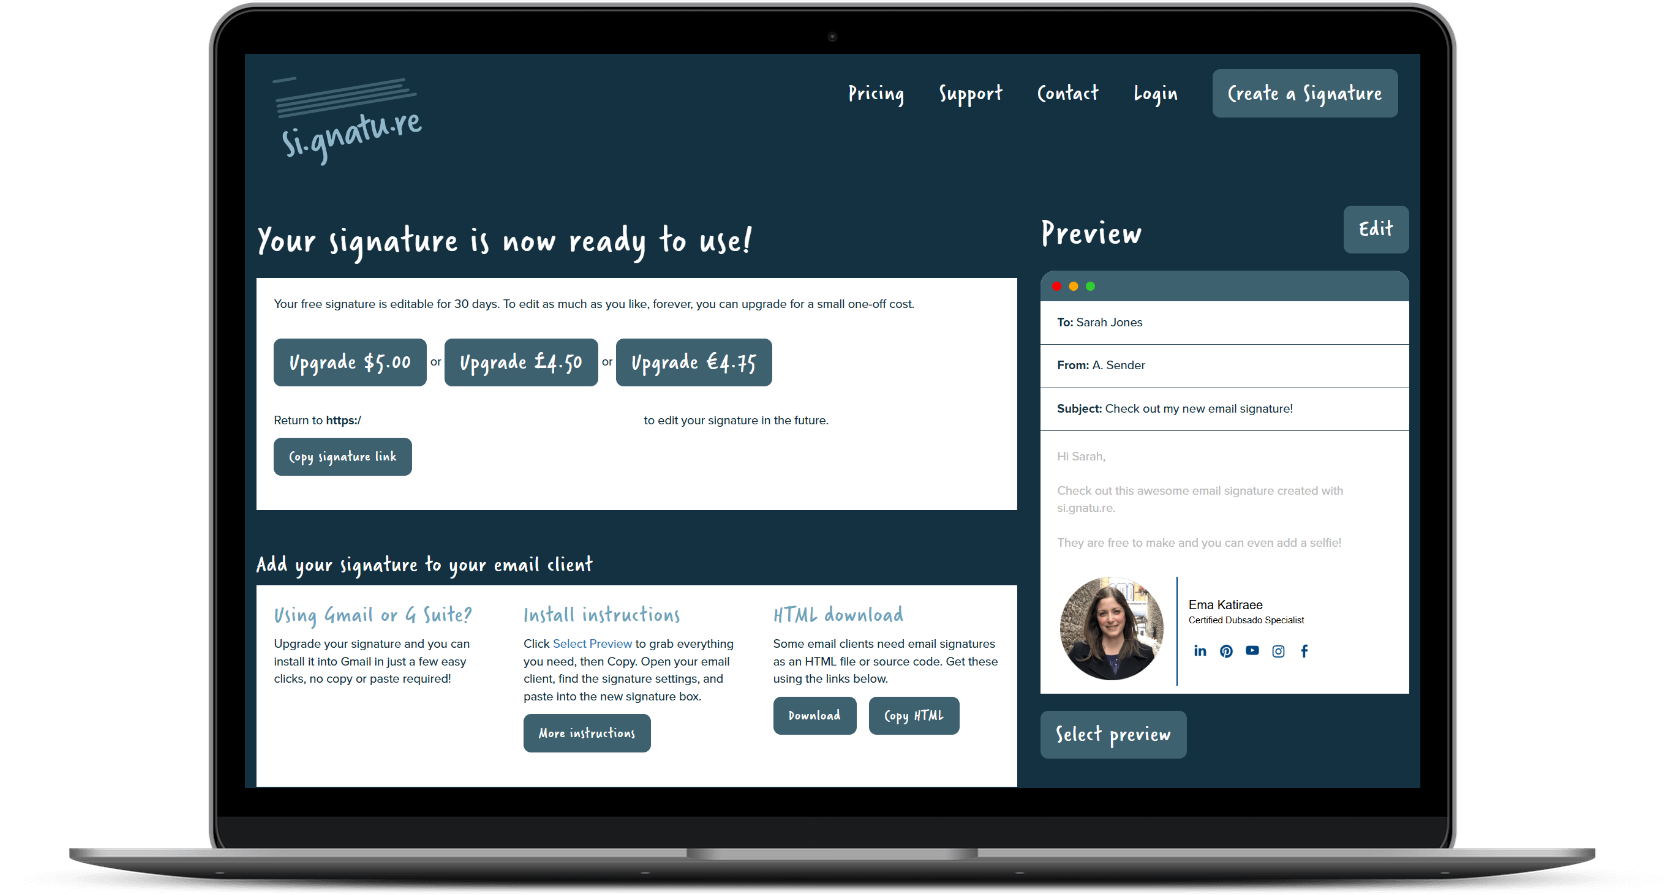
Email signature made in Si.gnatu.re
Hubspot
Click ‘Create my signature’.
Details: Add your personal information (name, title), company name, phone number, website, email, address and enter all your social links. You have the option of adding information in a custom field (office hours, pronouns, etc.) and including a footer with legal content or disclaimer.
Images: Add the links to any of the images you’d like to use in your signature (profile picture, company logo or handwritten signature). You need to host the images, uploading them to your website is a great option.
Templates: Choose the template structure that works best for you.
Styles: edit the colors and font of your signature. You can also add a custom CTA with its own text, link, colors and image (like book appointment,.
Once your signature looks the way you want, click ‘Create signature’.
Next click ‘Confirm & submit’.
Click ‘Add to Gmail’ or ‘Add to Outlook’ or ‘Copy signature source code’ depending on where you want to use the signature.

Email signature made in Hubspot
Signature Hound (now paid)
Go to Signature Hound.
Click ‘Create a new signature’. Once your template appears start working your way down the far left menu.
Templates: Choose the template structure that works best for you. I chose ‘Vertical 02’.
Personal Info: Add your profile image if you’d like. Adjust the size, fill in your personal info (name, job title, department, email, phone number and scheduling link).
Business Info: Add your logo if you’d like (it will appear under your photo). Fill in your business info (company name, address, website, social links).
Design: toggle on/off the elements that you want. Set the style of icons you want to use, set the color of different elements, set your font size and line height, and more. I love the level of detail you can control.
Call to Action: add a call to action image underneath your email signature. You can add a link to that image to help promote your offer during your launch period.
Disclaimer: you can add a company / legal disclaimer to your emails.
Click ‘Install Signature’ at the top right of your screen.
Select the app where you would like to install the signature: Gmail, Outlook, Proton Mail, etc. and follow the instructions.
To copy the HTML code, select one of the options above. When the pop up opens, click ‘Copy Signature’.

Email signature made in Signature Hound
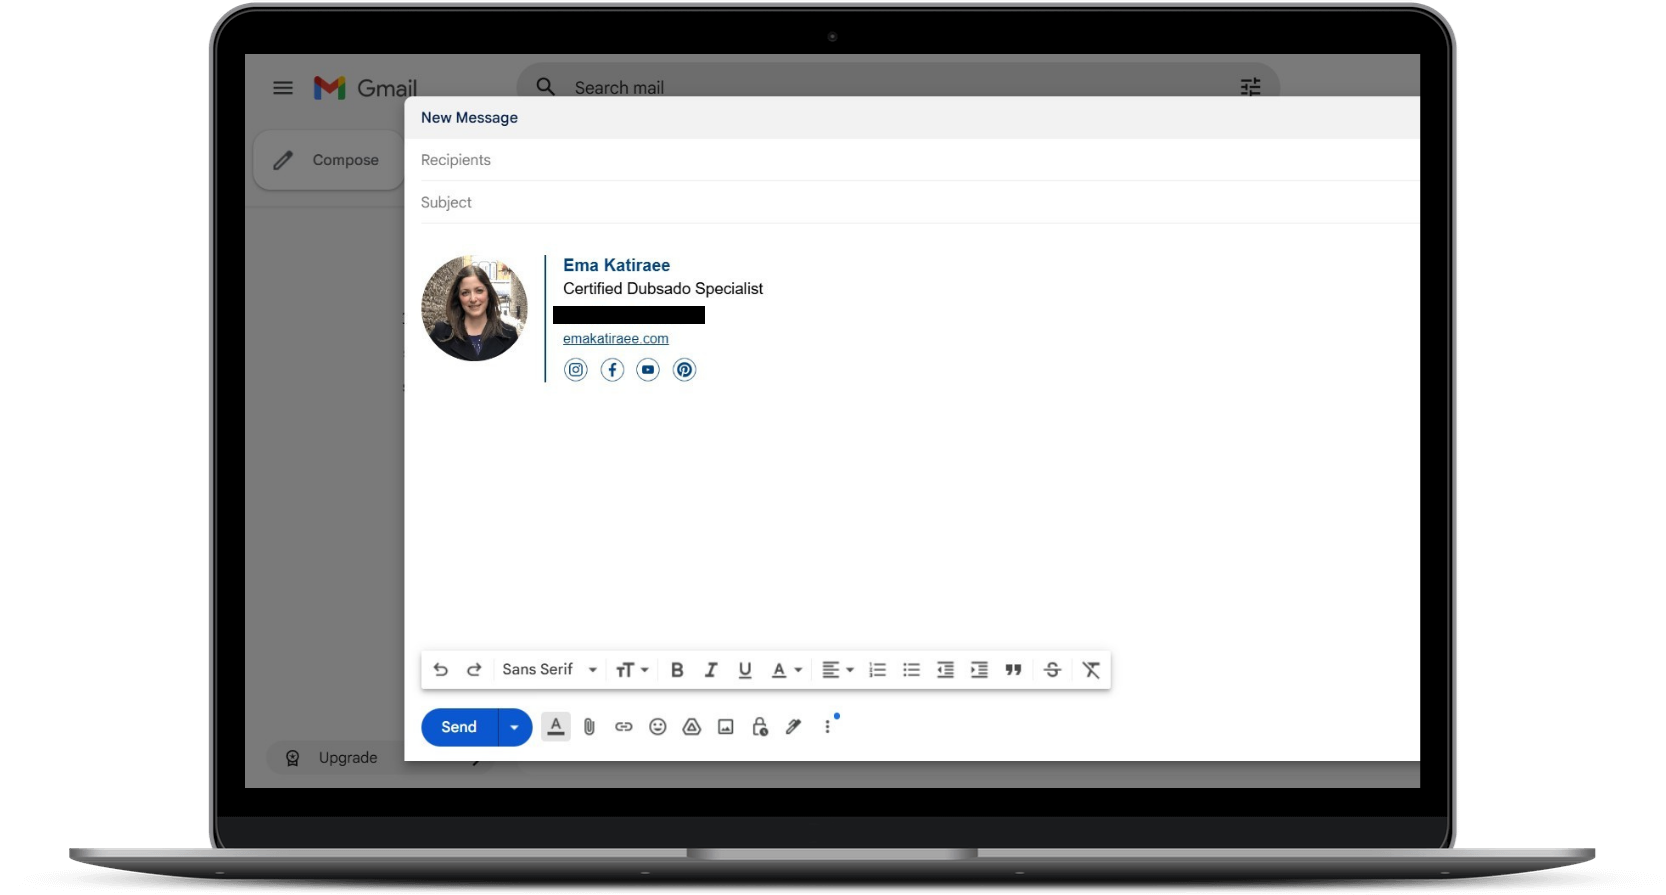
How to Add Your Email Signature Code in Gmail
Some of the signature generators have direct links to install it for you, but in some cases you need to install it yourself. Here’s how:
Go to Settings → See all Settings
In General, scroll down to Signature
Click ‘+ Create New’ and paste the HTML code.
Choose when it appears (new emails, replies, or both)
Scroll to the bottom of the page and click Save changes.
Send yourself a test email to make sure everything looks correct.
How to Add Your Email Signature Code in Dubsado
Go to Template → Canned Emails → ‘Signature’ above the list of canned emails
Click the ‘Code View’ icon and paste the copied code into the signature box
Click ‘Code View’ again to see the end result
To check what your signature looks like, create a test project/client and send yourself an email
Note: You might see light gray lines around your signature when sending emails. These lines are not visible to the recipients. To check what your signature looks like to clients, create a test project and send yourself an email.
How to Use ChatGPT as an Email Signature Creator
If you want complete control over layout, colors, fonts, and dividers, ChatGPT can act as a free email signature maker.
Steps to create your email signature with ChatGPT:
Open ChatGPT.
Copy and paste the prompt provided below into the chat.
Replace the placeholders with your details: name, title, email, website, and the URLs for your profile image and social icons.
Tip: For best results, host your images on your own website.
You can design social media icons in Canva, download them as PNG files with a transparent background, and upload them to your site to generate the URLs.
Run the prompt and ChatGPT will generate the HTML code for your custom email signature.
Copy the HTML code from ChatGPT. You can then paste the code or rendered version into Gmail, Dubsado, Outlook, or other platforms.
ChatGPT Prompt:
Create HTML code for an email signature that works in Gmail and Outlook using table markup only. Use web-safe fonts.
Layout:
• Left: a 100 by 100 profile image using this URL: [INSERT IMAGE URL]
• Center: a vertical divider that is exactly 2px wide, with color [INSERT HEX COLOR], and positioned equidistant between the image and the text by using equal-width spacer cells on both sides of the divider
• Right: five horizontal lines stacked:
1) Full name: [INSERT NAME]
2) Title: [INSERT TITLE]
3) Email address: [INSERT EMAIL]
4) Website: [INSERT WEBSITE]
5) A single row with four social media icons, each 24px by 24px, with links:
- [ICON URL 1] + [PROFILE LINK 1]
- [ICON URL 2] + [PROFILE LINK 2]
- [ICON URL 3] + [PROFILE LINK 3]
- [ICON URL 4] + [PROFILE LINK 4]
Typography and colors:
• Base font family: Arial, Helvetica, sans-serif
• Name: bold, 16px, color [INSERT HEX COLOR]
• Title: regular, 15px, color [INSERT HEX COLOR]
• Other text and links: 13px; use [INSERT HEX COLOR] for link color; links should have no underline
Other requirements:
• Use spacer cells to keep the divider centered with equal left and right spacing (for example, two 16px cells around a 2px divider cell)
• Keep background white or transparent
• Add sensible padding so the layout is balanced
• Do not use external CSS or unsupported properties
Gmail Email signature made with ChatGPT
How to Add Your Email Signature Code from GhatGPT in Gmail
Sometimes, when pasting raw HTML into Gmail, the code shows up as plain text. Gmail doesn’t have a “code view,” so here’s the workaround:
Copy your HTML code and paste it into a blank file.
On Windows, use Notepad.
On Mac, use TextEdit set to plain text.
Save the file as signature.html
Open that file in your browser (Chrome, Safari, or Firefox). You’ll now see your signature fully formatted.
Highlight the entire signature with your mouse and copy it.
Go back to Gmail → Settings → See all settings → Signature. Create or edit your signature, then paste the copied version into the signature box.
Scroll to the bottom of the page and click Save changes.
Send yourself a test email to make sure everything looks correct.
This ensures Gmail receives the styled version of your signature, not the raw code, so it will show up correctly.
Best Practices for Email Signatures
Keep it under 5 lines of text.
Use web-safe fonts.
Make sure links open in a new tab.
Avoid large images that take long to load.
Test by emailing yourself before sending to clients.
TL;DR
A professional email signature builds makes you look professional and gives people easy ways to connect with you. Here’s how:
Canva: Create a branded image signature (looks nice but only one clickable link).
Signature Generators: Tools like Si.gnatu.re, HubSpot, or Signature Hound (paid) let you build fully clickable HTML signatures.
ChatGPT: Generate custom HTML code with full control over fonts, colors, dividers, and icon placement.
Add to Gmail: Use Settings → Signature (paste rendered version if code shows as text).
Add to Dubsado: Insert under Canned Emails → Signature.
What to Include: Name, title, contact info, social links, and one clear call to action.
Best Practice: Always send yourself a test email to check formatting and links before using with clients.
Frequently Asked Questions
1. What should I include in my Gmail email signature?
Your Gmail signature should include your name, title, business name, email, phone number, website, and a few social media links. You can also add a small logo or headshot for branding, plus one clear call to action such as “Book a free consultation.”
2. Should I use an image or HTML code for my email signature?
Text-based signatures with HTML are a better choice because every element is clickable (email, website, social links). Image-based designs (like Canva) look nice but only allow one link.
3. Can I add my logo or headshot to my email signature?
Yes, but keep it small (around 100px wide). Large images can slow down email loading or display inconsistently across email platforms.
4. What is the best free email signature generator?
Free tools like Si.gnatu.re and Hubspot email signature creator are reliable options for making a Gmail signature. Canva is also popular if you want a simple image-based design, but keep in mind that only one link can be clickable.
5. How do I add an email signature in Gmail?
Once you have the design, go to Gmail → Settings → See all settings → Signature → + Create New, and paste in your signature.
6. Can I use ChatGPT to create my email signature?
Yes. With the right prompt, ChatGPT can generate custom HTML code for your email signature. This gives you full control over fonts, colors, dividers, and icon placement. You can then paste it into Gmail, Outlook, or Dubsado.
7. Why is my Gmail signature showing code instead of formatting?
Gmail doesn’t allow pasting raw HTML code directly. To fix this, save your code as an .html file, open it in a browser, copy the rendered signature, then paste it into Gmail’s signature editor. This ensures your Gmail email signature displays correctly.
8. How do I make sure my Gmail email signature looks right for clients?
Always send yourself a test email. Check that the images load properly, links open in a new tab, and the formatting looks consistent across Gmail, Outlook, and mobile apps.
Video Tutorial: How to Create an Email Signature
Watch these step-by-step YouTube tutorials where I show you how to create an email signature using Canva and Signature Hound.
Need Help With Your Dubsado Setup?
Need more support setting up Dubsado? I can help you with my Done-For-You Dubsado setup.
To learn more, book a free discovery call. We’ll talk about where you need help, I’ll share my recommendations on next steps for you and we’ll decide if it makes sense to work together.
