10 Cool Dubsado Features (You May Not Know About)

Dubsado has some really amazing features that you already know about. But there are also some features that are a bit more hidden you may not know about.
Some of these features I only learned after using Dubsado for some time - so I’m pretty sure there’s at least one feature in this list that will be new for you.
I'll take you through some of my top 10 favorite more hidden features in this blog post.
1- Add notes to invoices
Are you getting paid through payment processors outside of Stripe, Square or PayPal?
You can add a note to your invoices letting people know how to pay you through other methods like e-transfer, Venmo or Zelle. This will save you having to email this info separately.
You can also use this area to add information like your tax information or anything else that is relevant on your invoices.
To add a note to your invoices in Dubsado, go to your settings (gear icon at the top right)
Go to 'Payments and Invoices'
Scroll down to ‘Invoice Settings’
Under ‘Invoice Terms’ add any note(s) at the top or bottom of your invoices
Click ‘Save’ and done!

2- Custom Mapped fields
There are two types of custom mapped fields in Dubsado: client and project mapped fields.
Custom client fields are information that will remain in the client profile and follow the client across all their projects.
Custom project fields are information that are project specific - they are attached to a single project in Dubsado for a specific client.
You can create custom mapped fields in Dubsado and then map (or connect) them to short answers in a form.
Some examples of custom mapped fields are:
Social media links (custom client field) - the answer will show up in their client profile.
Number of guests (custom project field) - the number provided will show up in the clients project for easy reference.
Referral (custom client field) - when someone fill this form field in the lead capture form, it lets me know who referred them. I can easily see the answer in their project and thank that person. No need to open the lead capture form to find the information.
You can also add information into custom mapped field manually directly in their project or profile.
The best part is that custom mapped fields will auto-populate into emails or forms when you use the smart field that references them.
To create a custom mapped field in Dubsado, go to your settings (gear icon at the top right)
Go to 'Custom-mapped fields' and select Client or Project
Click 'Create'
Write the name of the mapped field you want to create and select the type: ‘Short answer’ for text answers or ‘Date’ for date types
Click ‘Save’ and done!
When you’re in a form or an email, you can pull the smart field for this custom mapped field from the Smart field list, under ‘Project’ or ‘Client’ depending on the type. Just know that you need to scroll to the very bottom of the list to find it.

Create your Custom Mapped Field in Dubsado
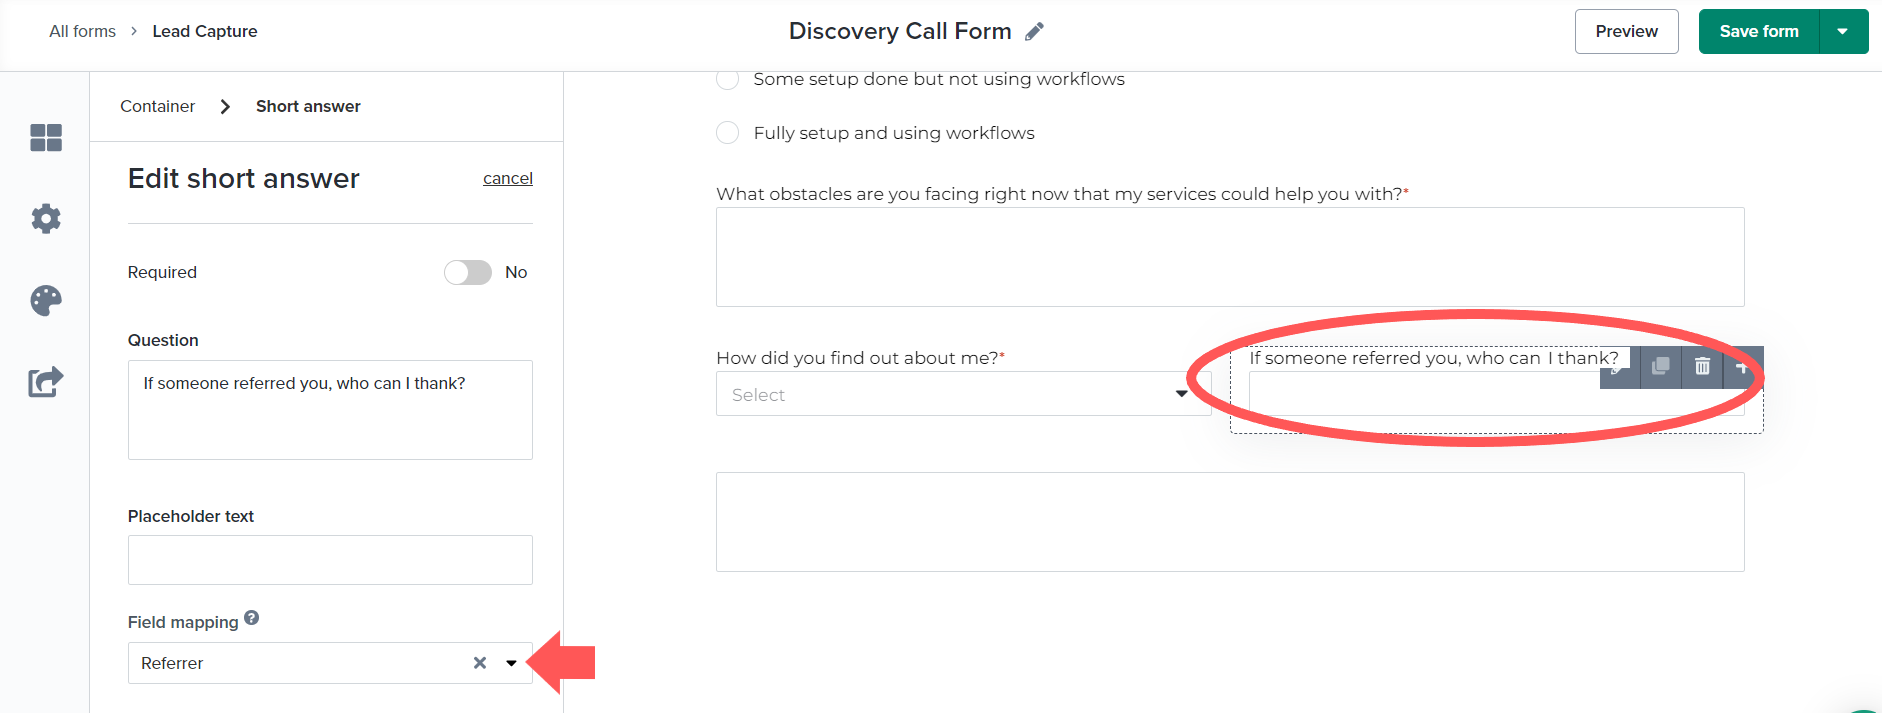
Add your Custom Mapped Field to a Dubsado form
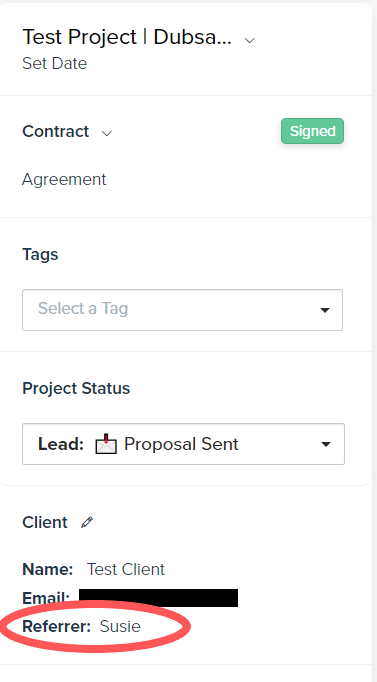
Once the form is submitted, you can see the answer in the clients project
3- Drag forms across form types
If you accidentally created a form as a lead capture and it was supposed to be a questionnaire, no problem!
On the forms tab, just drag it across the columns to the right one.
What?!?! 🤯 This one blew my mind when I found out it was possible.
This means that if you have a nice proposal template in your account - you can create a copy and drag it over to your contract or questionnaires column to use the design elements and create matching forms.
Just make sure that you’re adding the right elements and removing certain elements depending on where you’re dragging it to/from.
Example: if dragging a proposal over to a contract column, add the signature fields and remove the package elements.
4- Add expiration dates to forms
This is exactly what it sounds like, it adds an expiration date to your forms so they can no longer be submitted after a certain date.
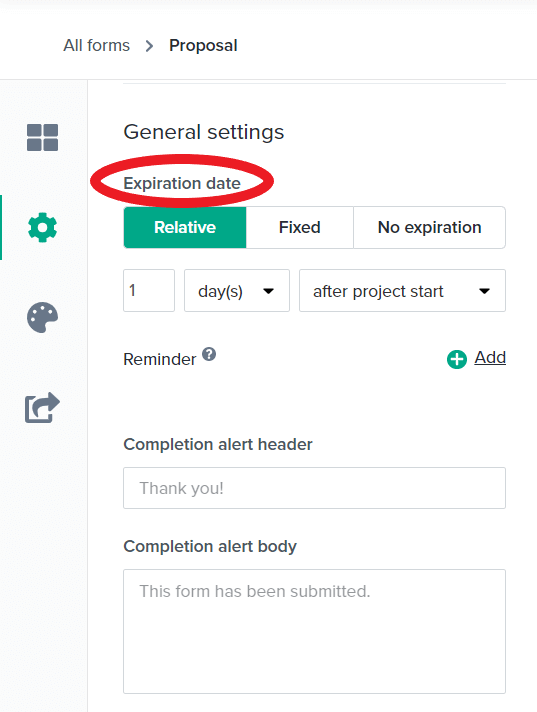
You can set the expiration date in several ways:
Relative: you can set the form to expire based on specific triggers: X days before or after project start, X days before or after project end, or X days after applied to project.
Fixed: You set a fixed expiration date for all clients using this form.
No expiration: no expiration date is set, meaning that this form can be submitted anytime in the future if the project is still live.
Why use this feature?
To avoid people submitting a proposal months later - your prices may have changed, your offer may have changed so you want to set a time limit in case things change in your business.
To help people make a decision - I don’t like pressure tactics, but it’s also important to set a deadline to help people come to a decision around working with you. It’s not fun to be in a state of uncertainty, and this helps put an end to that.
5- Customize the preview title and image for your Dubsado forms and portal
You can change the title and appearance when sharing links to Dubsado forms and client portal. This is the information that will appear in the browser or when you share the links on social media.
If you don’t change the title and description, the default title will say “Dubsado CRM for Creatives”. The description will read: “Dubsado, client management refined for the creative entrepreneur”. And it will have no social image or favicon.
That description can be a bit confusing for everyone, so if you haven't already, go ahead and update it.
To update the title and images, go to your settings (gear icon at the top right) then to ‘Domain names’ and go to the ‘URL Meta Information’ section.
You can change the following settings:
1. Page Title: this is the title that shows up in a browser (hover over any open browser tab to see) or when the link is shared on social media. Keep the page title between 30-60 characters.
2. Description: this is the preview text that will show up under the title when the link is shared on social media. It’s the same for all your Dubsado links, so use a general description between 55-200 characters.
3. Preview Image: this is the image that is displayed when you share a link on social media. The recommended image ratio for a social preview image is 1.91:1, the optimal size would be 1200 px x 630 px. When creating this image, keep in mind that sometimes it gets cropped into a square.
4. Favicon: this is the tiny logo that you see in your browser bar. It’s helps quickly identify which browser tab has your link in it. It’s usually a small or simplified version of your logo. Make sure your favicon has a transparent background before uploading it.

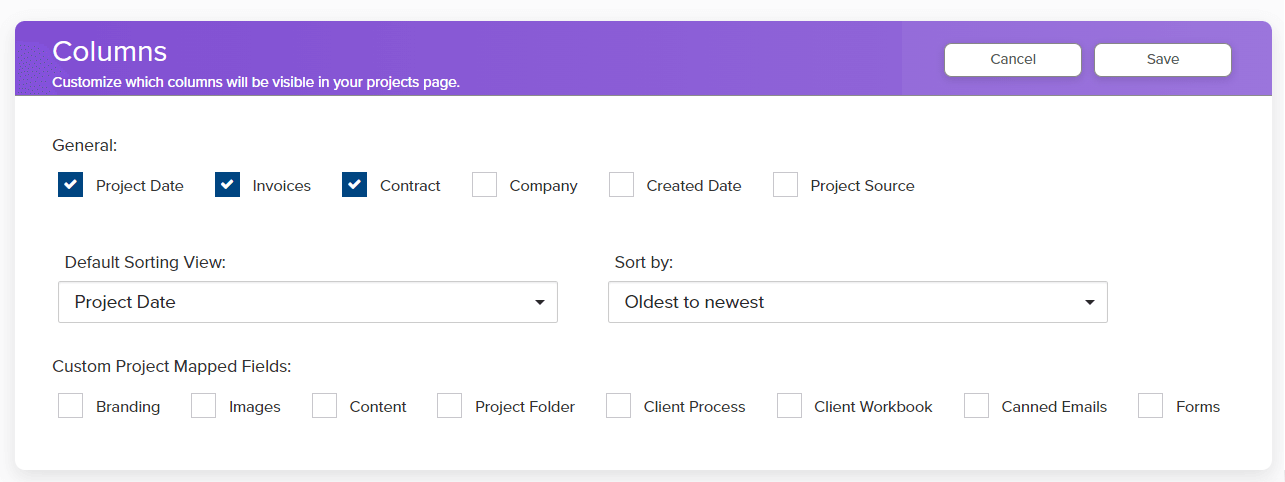
6- Customize project views
Are there certain pieces of information you’d like to see about your projects in the main view?
You can customize what is displayed to show or remove the following items:
Project Date
Invoices
Contract
Company
Created Date
Project Source
You can also change the default sorting view and also change if it’s sorted by oldest to newest, or newest to oldest.
This helps you view your projects in the order that is most meaningful to you.
7- Redirect URL for schedulers and forms
Add a redirect URL to your forms or schedulers to send your audience to another page after they submit.
You can redirect to a page on your website that is relevant, or even create a special thank you page where you can embed a video or insert instructions that they need to know about.
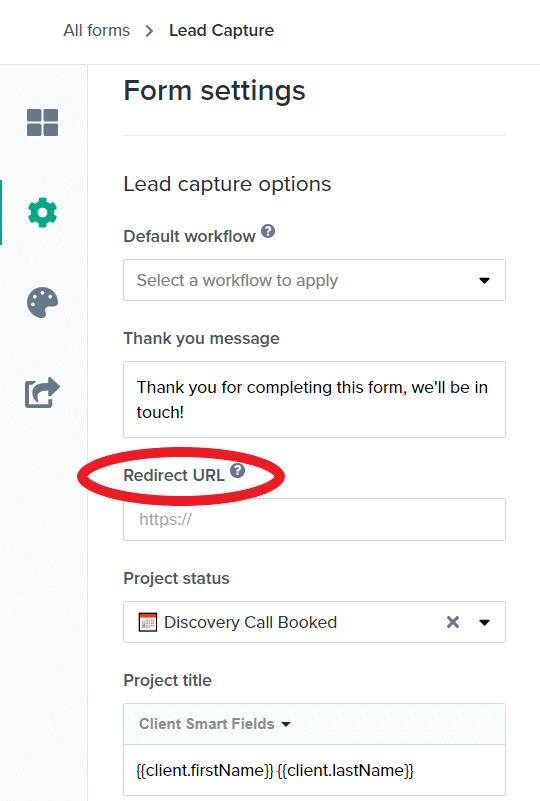
To add a redirect URL to a public proposal or lead capture form in Dubsado:
Go to the form ‘Settings’ (left hand side menu)
Under ‘Redirect URL’ insert the full link you’d like to redirect people to
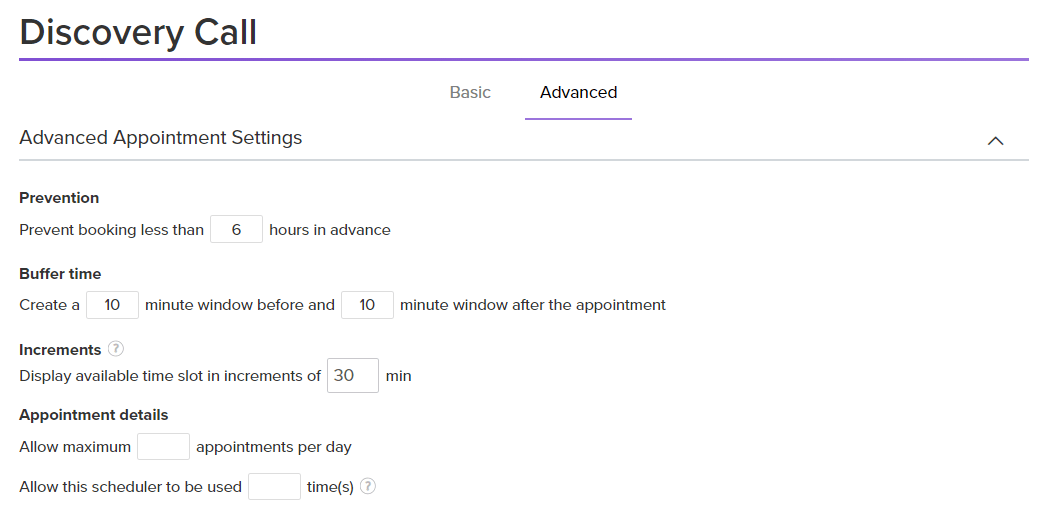
To add a redirect URL to a scheduler in Dubsado:
Go to the ‘Advanced’ settings of your scheduler
Scroll down to ‘Redirect URL’ and insert the full link you’d like to redirect people to
Make sure you save the changes!!
8- Add buffer times to appointments
If your meetings are happening back to back and you feel like you’re scrambling a bit, add a buffer to your appointments in the Dubsado scheduler.
This will help spread out your meetings and help you avoid meeting overlaps in case a meeting goes long.
To add buffers to your appointment schedulers in Dubsado:
Go to the ‘Advanced’ settings of your scheduler
Under ‘Buffer time’ and the buffer you’d like to use before and after the meeting. You don’t have to use both, but definitely can.
Make sure you scroll down to save the changes!!
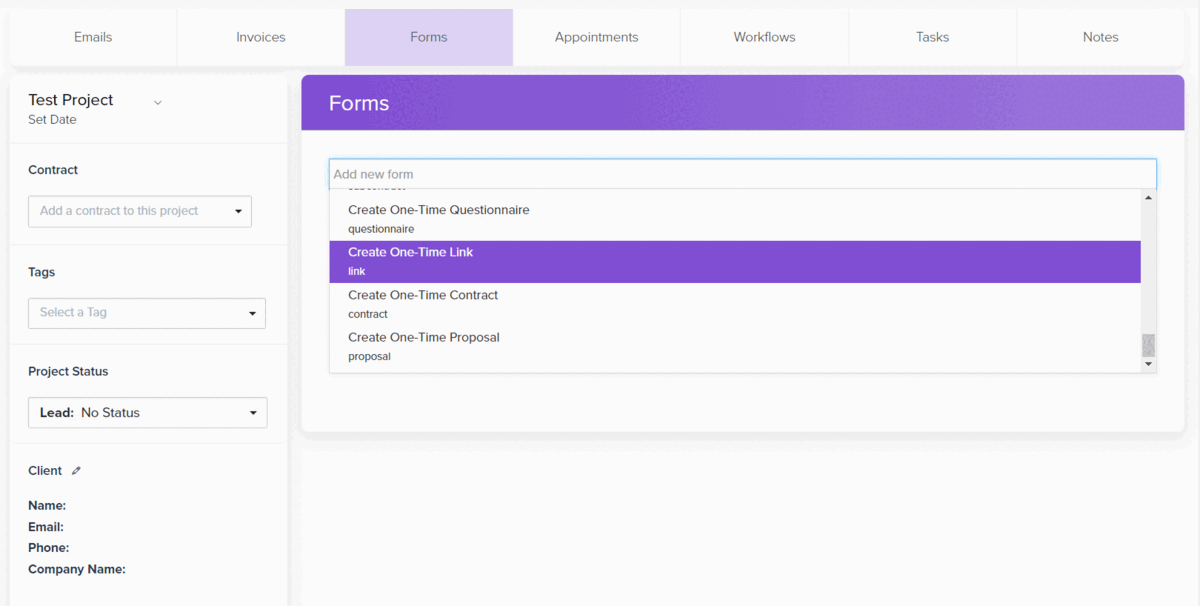
9- Add an external link to your to client portal
You can add external links to the portal for your clients to check out.
This allows you to share links like a Loom video, YouTube video, gallery link, etc. with your clients directly in their portal.
To add an external link to you clients project:
Go to their project, then go to the ‘Forms’ tab
From the drop down menu to add forms, select ‘Create One-Time Link’
Add the title of the link and the URL
Once added to the project, click ‘Apply to Portal’
10- Enable or disable autopay on payment plans
With the new autopay changes in Dubsado, you can decide if autopay is disabled, is optional or required for different payment plans you use.
This is great because it adds flexibility and allows you to decide when autopay is needed in your business.
To change the autopay settings for a specific payment plan:
Go to the Payment Plans tab
For the payment plan you want to edit, select the autopay setting
Decide which option you’d like to use: disabled, optional or required.
You can also select ‘Reset to brand setting’, which will revert the autopay setting for this payment plan back to the main option selected in the Dubsado brand settings.

Bonus - Add Emojis to your Project Statuses
I add emojis to my project statuses because as a visual person, it helps me quickly understand which project status I’m looking at and avoid mixing things up.
Some examples:
📅 Discovery Call Booked
⏳ In Progress
✔️ Complete
Cool, huh?

Need help setting up Dubsado for your business?
If you need help setting up Dubsado for your business and want an expert to help you, I’m here to help.
Book a free, no-strings attached discovery call and see if a Dubsado setup is right for your business 👉 Schedule your call
