How to Create a Client Welcome Packet
Last Updated December 2025
TL;DR: A client welcome packet is a document you send to new clients after they've booked - it sets expectations, outlines your process, and makes you look like you have your stuff together. This post covers what to include, what to skip, how to build one in Canva, and how to share it with clients. The step-by-step tutorial video is below if you'd rather watch than read.
If you've ever had a client email you three days into a project asking something you already covered in your contract - this post is for you.
A client welcome packet won't solve everything, but it does make your onboarding feel intentional. It gives clients a clear picture of how you work, what they can expect, and where to find information when they need it. Done well, it sets the tone for a smooth project before the work even starts.
Here's everything you need to know to create one.
Watch the Tutorial
Prefer to watch instead of read? The full tutorial below walks you through how to create a client welcome packet in Canva and Dubsado, plus how to share it using a Canva link, Google Drive, or your website.
What Is a Client Welcome Packet?
A client welcome packet is a document you send to clients once they've booked with you. It covers your process, timelines, deliverables, policies, and anything else they need to know to work with you smoothly.
Think of it as a warm, professional handoff from "they just signed the contract" to "they know exactly what to expect next."
Welcome Packet vs. Service & Pricing Guide
This is worth clarifying before you start building, because it's a common mix-up.
Your welcome packet is for clients - people who have already booked. It's a reminder of how things work, not an introduction to it. Everything a client needs to know before they sign should already have been covered in your discovery call, proposal, or follow-up emails. The welcome packet can reinforce that information, but it shouldn't be the first time they're hearing it.
If you're creating something to share with leads - people who are still deciding whether to work with you - that's a service and pricing guide, not a welcome packet.
In summary:
Welcome Packet → for clients
Service & Pricing Guide → for leads
Why It's Worth Having One
A welcome packet does a few things at once: It makes a strong first impression, reduces back-and-forth by answering common questions upfront, reinforces your brand, and helps clients feel confident about what they signed up for. It also quietly signals that you run a professional, organized business - which matters more than most people realize.
What to Include in Your Client Welcome Packet
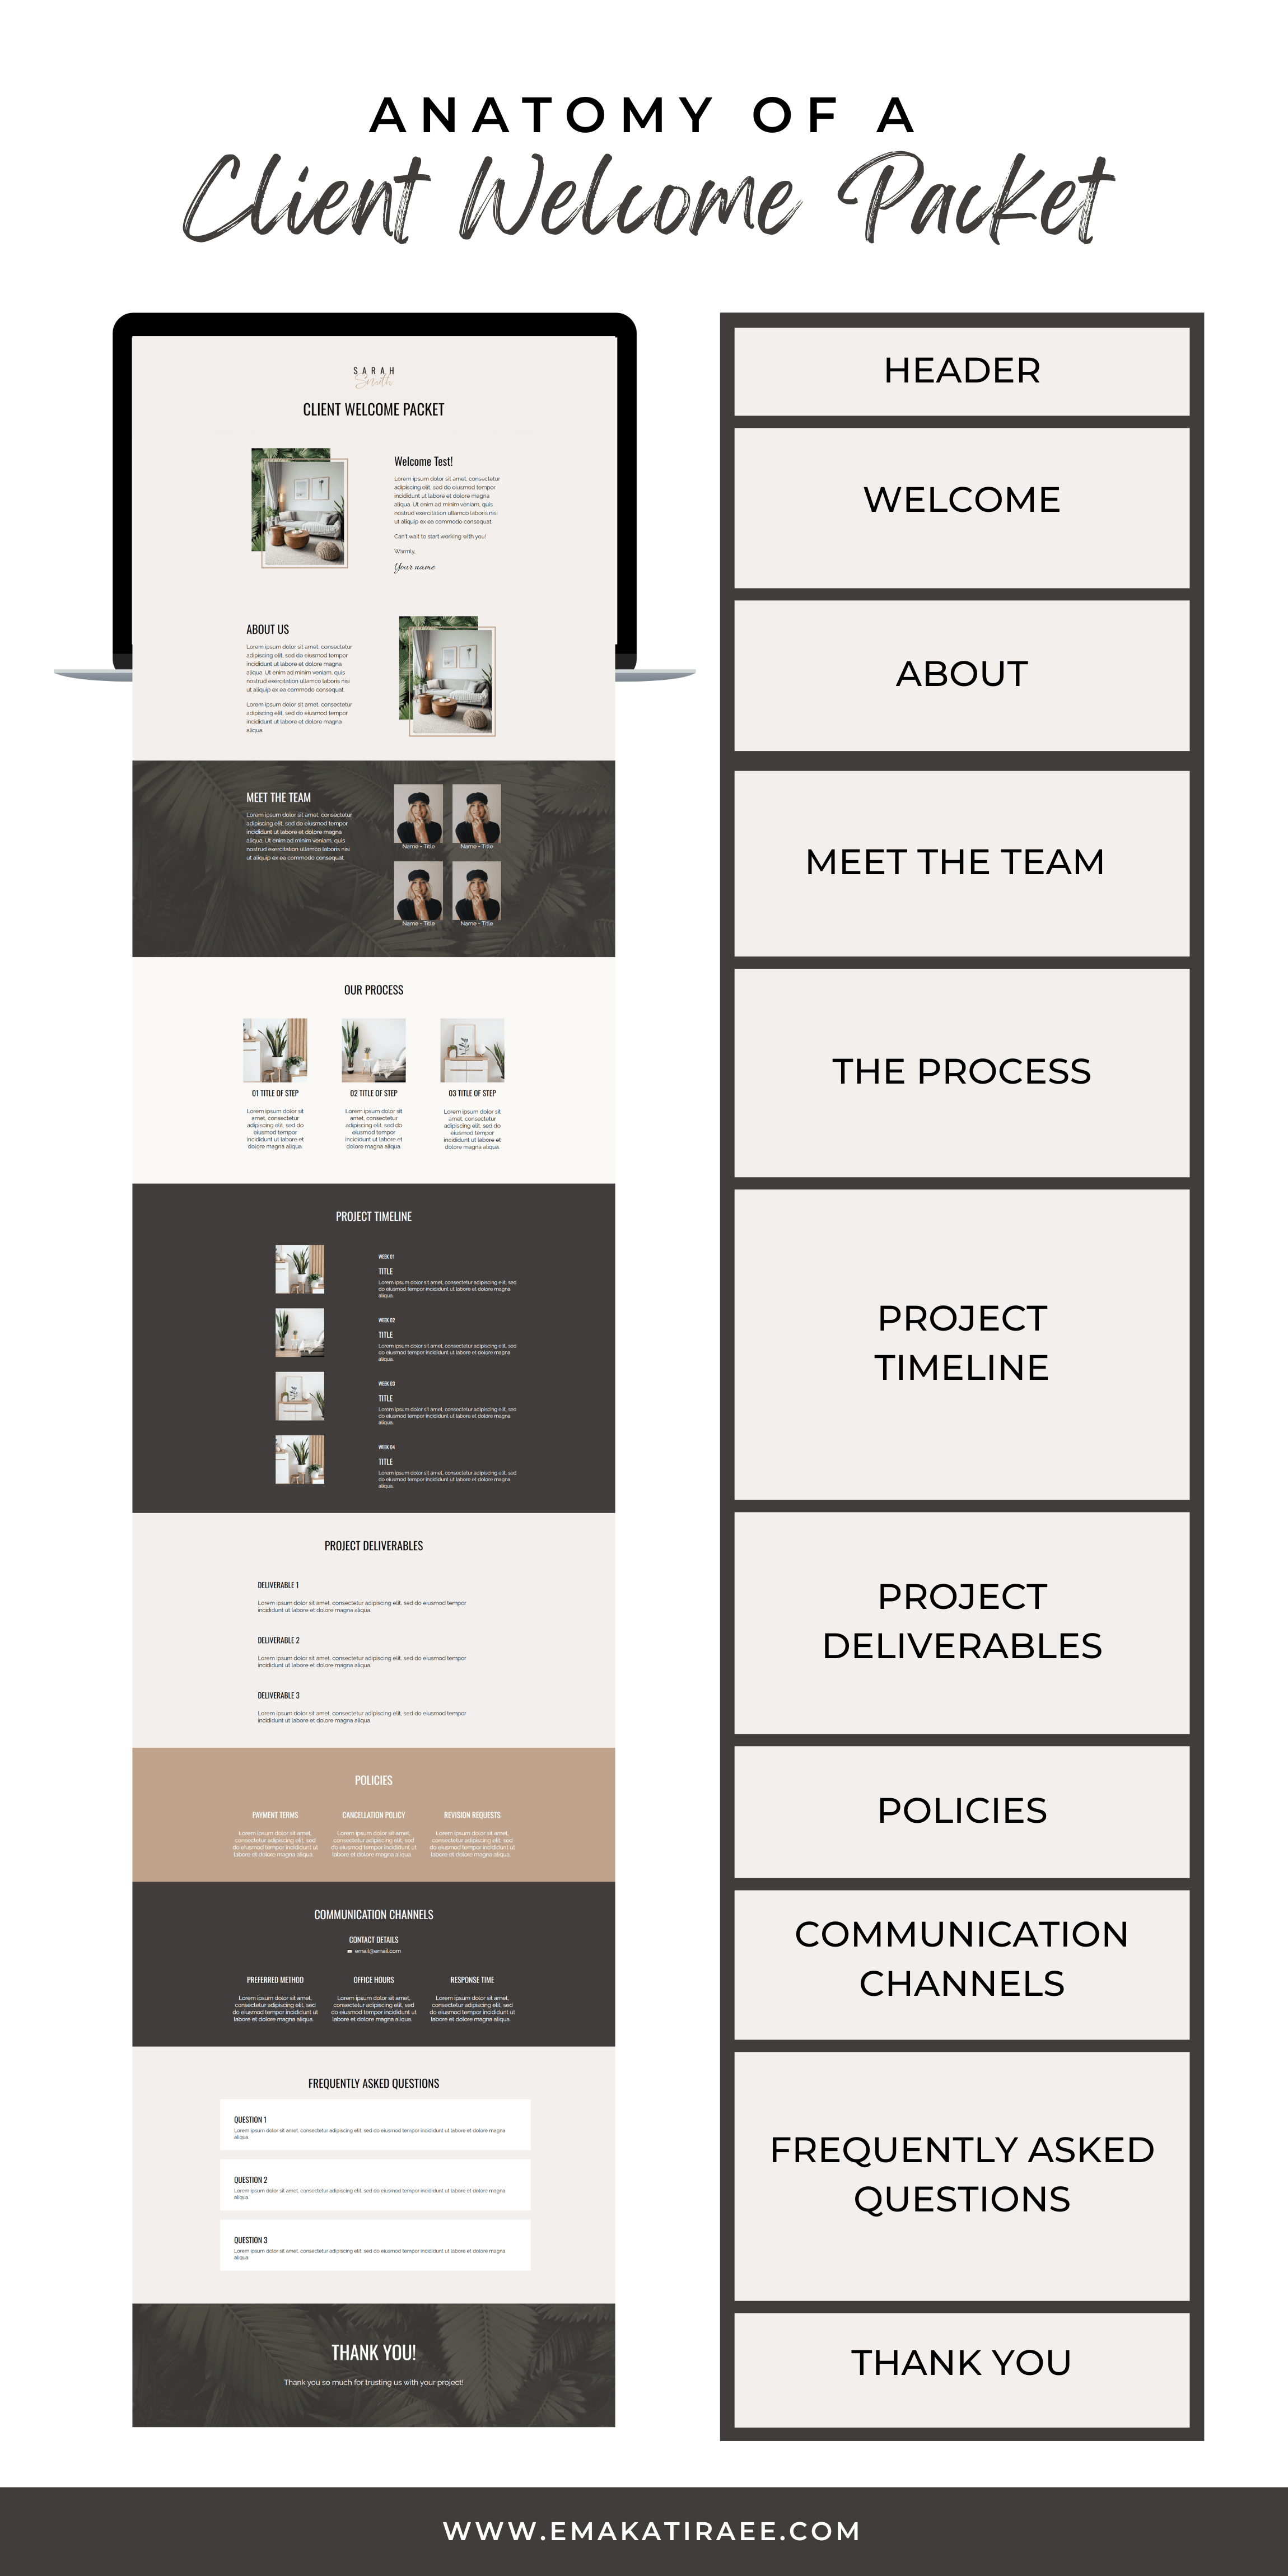
There's no single right answer here. Include what's actually useful for your clients, and leave out anything that would just be filler. Here are some sections worth considering:
Welcome: a short, genuine note welcoming them to the project and expressing that you're looking forward to working together.
About Us: a brief intro to who you are, what you stand for, and why you do what you do. This is especially helpful for clients who found you through a referral and don't know much about you yet.
Meet the Team: if other people will be involved in the project, introduce them here with names, photos, and a line or two about their role.
Process & Timeline: walk them through what the project looks like from start to finish. What happens when, what milestones to expect, and any key dates or deadlines.
Deliverables: a clear list of what's included in their package and when they can expect each piece.
Policies: payment terms, cancellation or rescheduling policies, revision rounds, and anything else they should know upfront.
Communication Channels: how and when to reach you. This is also a good place to set boundaries around response times and preferred communication channels.
Frequently Asked Questions: a short list of questions you get asked regularly. It saves everyone time.
What NOT to Include
This is my personal opinion, but I'd keep client homework and next steps out of the welcome packet.
If you need a client to do something - fill out a questionnaire, send you files, review a document - put that in its own email. A standalone email is much harder to miss than a page buried inside a multi-section packet. Clients are more likely to actually do the thing if it's front and center, not sandwiched between your refund policy and your team bios.
How to Create a Client Welcome Packet in Canva
Canva is the easiest place to start. If you have Canva Pro, search "client welcome packet" under Templates and you'll find a solid range of options.
Focus on the structure and the sections included rather than the colors and fonts - those are easy to swap out. Once you find a template you like, click Customize this template to copy it to your account, then edit it with your branding, photos, and content.
You can also find Canva templates on Etsy or Creative Market if you want something more specific to your industry.
A couple of things to keep in mind as you build:
Create something that works for all of your clients (or at least all clients on a specific package). The more you have to customize it per person, the less useful it becomes as a system. The goal is something you can send confidently without spending an hour on it each time.
Where to Host and Share Your Welcome Packet
Once your welcome packet is designed, you need somewhere to host it so you can share a link with clients. Here are the main options:
Share Directly from Canva
The simplest option. No downloading required.
Click Share (top right)
Click View-only link
Copy the link and use it wherever you need it
Host on Google Drive
Good option if you want to share it as a PDF.
In Canva, click Share, then Download, and select PDF Standard
Choose the pages to include and download the file
Upload the PDF to Google Drive
Right-click the file, select Share, and change access to Anyone with the link
Copy the link
Worth knowing: if you update the welcome packet later, you can replace the file in Google Drive without changing the link. Right-click the file, go to File information, click Manage versions, then Upload new version. The link stays the same.
Host on Your Website (Squarespace)
Good option if you want the URL to reflect your domain.
In Squarespace, go to Pages
Click the + next to Not Linked (so it doesn't appear in your navigation)
Select Link from the More section
Click the gear icon, select File, and upload your PDF
Save, then copy the URL
Note: Squarespace will show you a partial URL like /s/filename.pdf -- add your full domain in front of it before sharing.
Create a Welcome Packet in Dubsado or HoneyBook
If you're using Dubsado or HoneyBook, you can build your welcome packet directly inside your CRM as a questionnaire (Dubsado) or smart file (HoneyBook) - just don't add any actual questions to it.
This approach lets you include smart fields like the client's name and email so it feels personalized, and you can send it automatically as part of a workflow or automation. No manual sharing required.
If you're a photographer or wedding planner already using Dubsado, this is the setup I'd recommend. It fits neatly into your onboarding workflow and takes one more thing off your plate.
FAQ
Does every business need a client welcome packet?
Not necessarily - but if you work with clients on projects that have a clear process, timeline, or set of deliverables, a welcome packet makes that process a lot smoother. It's especially useful if you find yourself answering the same questions repeatedly or if clients often seem unclear on what happens next after booking.
Should a client welcome packet be a PDF or a webpage?
Either works. A PDF is easy to download and reference offline. A webpage (or a Canva view-only link) is easier to update without resending anything. If you're hosting it in Dubsado or HoneyBook, it lives inside your CRM and gets sent automatically. Choose whatever format fits how you already work.
How long should a client welcome packet be?
Long enough to cover what's useful, short enough that clients actually read it. There's no magic page count, but most welcome packets land somewhere between four and ten pages. If yours is getting much longer than that, consider whether everything in it actually needs to be there.
Can I use the same welcome packet for all of my clients?
Yes, and I'd encourage it. Creating one packet that works across all clients (or all clients on a specific package) means you're not rebuilding it from scratch every time. If you offer very different services, you might have two versions - but the more streamlined you can make it, the easier it is to actually use.
What's the difference between a welcome packet and an onboarding questionnaire?
A welcome packet shares information with your client. An onboarding questionnaire collects information from them. They serve different purposes and are best sent separately - a welcome packet sets context and expectations, while a questionnaire gathers what you need to do the work. Keep them in separate emails so neither one gets buried.
When should I send the welcome packet?
Right after a client books - ideally as part of your automated onboarding workflow so it goes out immediately without you having to remember to send it. The sooner they receive it, the sooner any uncertainty about the process is resolved.
What happens after they read the welcome packet?
A beautiful client welcome packet is a great touchpoint, but it’s only one piece of the puzzle. If the rest of your process - from inquiry to offboarding - feels manual or duct-taped together, your clients will notice. Take this two minute quiz to see if your entire client experience matches the high-end brand you’ve built.
Ready to Streamline Your Onboarding?
If you're a photographer or wedding planner and you want your welcome packet (and the rest of your onboarding) to run automatically, Dubsado is worth looking into. I help clients build out their full Dubsado setup from scratch - workflows, forms, emails, the whole thing.
New to Dubsado? Use code EMAKATIRAEE for 30% off your first month or year
Or if you'd rather start with a conversation, book a free discovery call and we'll figure out if a Dubsado setup is the right next step for your business.
