How to Set Up Payment Plans in Dubsado
By Ema Katiraee, Certified Dubsado Specialist
TL;DR: Payment plans in Dubsado let you split invoices into installments and send automatic reminders so you're not chasing clients for payments. Here's how to create them, what settings to use, and how to connect them to workflows.
I'm not a big fan of chasing after client payments, so why not let Dubsado do it for you? Payment plans handle the installment scheduling and reminder emails automatically. Here's everything you need to know to set them up.
What Are Payment Plans?
Payment plans in Dubsado are a way to split up invoice totals into multiple payment installments. They allow business owners to offer flexible payment options, breaking down large invoice totals into manageable installments.
Payment plans also allow you to set the due dates of those installments to fit your business, and decide when to send out payment reminders to your clients.
Whether you're a freelancer, consultant, or small business, payment plans cater to diverse client needs and financial capabilities.
Types of Payment Plans
You can create payment plans to fit your business needs, but here is a list of the most commonly used payment plans in Dubsado:
Equal Payments: split the invoice into equal amounts - like 50/50 or 2 installments, 3 installments, 4 installments, etc.
Pay in Full: client pays in full when signing up.
Fixed Deposit: collect a fixed amount when client signs up, and collect the rest of the invoice in full or split it up into installments.
How Create a Payment Plan in Dubsado
Follow the steps below to create a payment plan in Dubsado:
Go to Invoicing → Payment Plans
Click + to Create new payment plan
Click the title (New payment plan) to update the title of the payment plan
Click +Add installment as needed
Payment Plan Installment Settings
For each installment in your payment plan, click the following settings to update each one:
Due Date:
Relative: payment installment is tied to the project start/end date, or when the payment plan is applied to the invoice or after contract signed. This is the most common approach for payment plans.
Fixed: set to a fixed calendar date.
TBD: when you need a placeholder and will set the payment due date later on based on project deliverables.
Amount Due:
Divide Equally: splits the invoice equally into however many installments you add to the payment plan.
The advantage of this option, is that if you need to add something to the invoice later in the project - it will split the added amount into the installments that are left to pay. Because of this, it’s my recommended option for payment plans.
Percentage: creates an installment based on the percentage of the invoice total. You can add multiple installments that are different percentages, it all just needs to add up to 100%.
If you have received a payment and the invoice total changes, this option will recalculate the installments still considering the installment that was paid - and therefore will give you a message that the payment plan is collecting less than the invoice total. Because of this, I don’t recommend using this option.
Fixed: add a fixed amount to the payment plan that will not change even if the invoice total does.
📌 Note: you don’t have the use all the same type of installment in a payment plan, you can combine these different types together. For instance: 1st installment is a fixed deposit + 2 equal payment installments to split the remaining amount on the invoice.
Reminders: send email reminders X days before or after the due date. Choose the email that will go out for each reminder. Dubsado has the following emails available to use:
Default payment reminder
Upcoming payment reminder
On the due date payment reminder
Past due payment reminder
📌 Note: To edit the payment reminder emails, go to the Messages section and find the email with the titles shown above and update as needed. You can even create more reminder emails if you need specific ones for different services.
Payment Plan Examples
50/50 or 2 installments
This payment plan example is a 50/50 split or 2 installments, where the first installment is due when the contract is signed and the second installment is due on the project date.
1st Installment
Due Date: Set the due date to Relative, and select 0 day(s) after contract signed by client.
Amount Due: Set the amount due to divide equally.
Reminders: Add a reminder 2 days after the due date. This reminder will go out 2 days after the contract is signed, only in the case that they sign the contract but don’t complete the payment. You can select the email in Dubsado titled Payment Reminder - Past Due.
2nd installment
Due Date: Set the due date to Relative, and select 0 day(s) before project start date.
Amount Due: Set the amount due to divide equally.
Reminders:
Add a reminder 2 days before the due date. This email will go out 2 days before the project start date. You can select the email in Dubsado titled Payment Reminder - Upcoming Payment.
Add a reminder 2 days after the due date. This email will go out 2 days after the project start date. You can select the email in Dubsado titled Payment Reminder - Past Due.
📌 Note: To create 3 installments or more, simply duplicate the second (or last) installment and edit the due date plus any other setting that needs to be changed.
Pay in Full
This payment plan example is a pay in full, where the first installment is due when the contract is signed.
1st Installment
Due Date: Set the due date to Relative, and select 0 day(s) after contract signed by client.
Amount Due: Set the amount due to divide equally. Since there are no other installments, it will be the full amount of the invoice.
Reminders: Add a reminder 2 days after the due date. This reminder will go out 2 days after the contract is signed, only in the case that they sign the contract but don’t complete the payment. You can select the email in Dubsado titled Payment Reminder - Past Due.
Fixed Deposit
This payment plan example is a fixed deposit, where the first installment is a fixed amount due once the contract is signed and the second installment is one week before the project date.
1st Installment
Due Date: Set the due date to Relative, and select 0 day(s) after contract signed by client.
Amount Due: Set the amount due to fixed deposit and set the installment amount.
Reminders: Add a reminder 2 days after the due date. This reminder will go out in the case that they sign the contract but don’t complete the payment. You can select the email in Dubsado titled Payment Reminder - Past Due.
2nd installment
Due Date: Set the due date to Relative, and select 7 day(s) before project start date.
Amount Due: Set the amount due to divide equally. This installment will be the remaining amount on the invoice minus the fixed deposit.
Reminders:
Add a reminder 2 days before the due date. This email will go out 9 days before the project start date. You can select the email in Dubsado titled Payment Reminder - Upcoming Payment.
Add a reminder 0 days after the due date. This email will go out on the due date - 7 days before the project start date. You can select the email in Dubsado titled Payment Reminder - Due Today.
Add a reminder 3 days after the due date. This email will go out 4 days before the project start date. You can select the email in Dubsado titled Payment Reminder - Past Due.
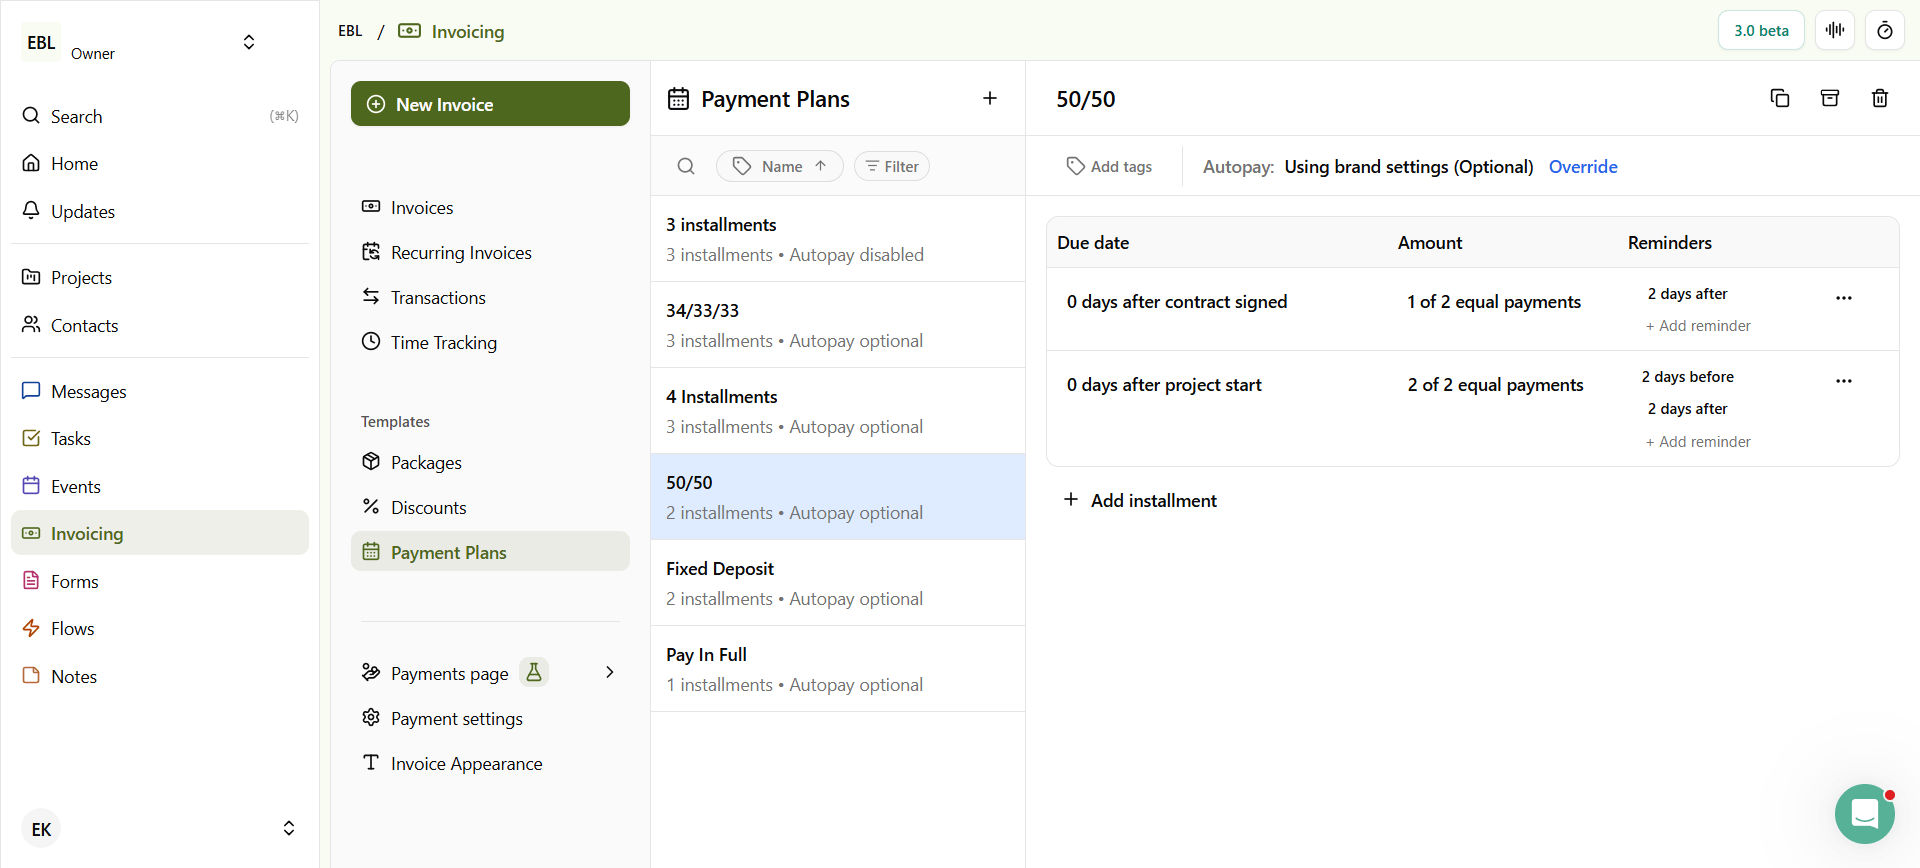
Dubsado 50/50 or 2 installment Payment Plan example
How to Manually Apply a Payment Plans to an Invoice
To manually apply an existing payment plan to an invoice in Dubsado:
Go to the client project, then go to the Invoicing tab.
In the payment plan section of the invoice, click Start a payment plan and select one that applies from the dropdown list.
Make any necessary edits to the payment plan once applied by clicking each element (the due date, amount, reminders).
Once everything looks ok, click Start.

Apply a payment plan to an invoice in Dubsado

Make any edits to the payment plan before starting
How to use Payment Plans in Workflows
To use a payment plan inside of an existing workflow:
Go to Flows → Flow Templates → click the pencil icon to edit the workflow
At the top, select the payment plan from the dropdown list
This will now allow you to use the trigger after invoice installment paid inside of your workflow. And you can select which installment will trigger the action from the payment plan you added to the workflow.
This is helpful to trigger actions when a client makes a specific payment: like sending their welcome email once their initial invoice installment is paid, or sending them a scheduler for their offboarding session once their final invoice installment is paid.
Important Considerations for Using Payment Plans in Workflows
If you are adding a payment plan to a workflow that sends a proposal you MUST NOT add the payment plan to the proposal. Why? It will cause an error in the workflow because the proposal payment plan will override the workflow payment plan.
If you add a payment plan to a workflow, it will automatically create an invoice for $0 inside the project, even if that person never signs up to work with you.
Tutorial: How to Build Payment Plans in Dubsado
Want Your Dubsado Payment Plans Set Up Properly?
If you want your invoices, payment plans, and workflows all built out correctly in Dubsado, I can help. Book a discovery call and let's talk about what that looks like for your business.
