Dubsado Post-Session Workflow Guide for Photographers
By Ema Katiraee, Certified Dubsado Specialist
Your photo session is done. Your client had a great experience, and now it’s time to follow up. Instead of sending emails one by one after each session, you can automate the entire follow-up process with Dubsado.
Using a post-session workflow in Dubsado helps you stay in touch, deliver files, ask for testimonials, and even bring clients back for future sessions. This saves you time and makes sure nothing slips through the cracks.
In this post, I’ll walk you through what to include in a post-session workflow and how to set it up inside Dubsado.
Why Photographers Should Use a Post-Session Workflow
A post-session workflow helps you:
Say thank you to your client after the session
Deliver their photo gallery in a professional and timely way
Ask for a testimonial or review
Share offers for future sessions or product add-ons
Stay top of mind with past clients
Save time by automating repeat tasks
Instead of writing the same emails over and over, Dubsado can do the follow-up for you. This means fewer admin tasks on your plate and more time behind the camera.
What to Include in Your Post-Session Workflow
Here are the most common steps photographers include in their post-session workflows:
Step 1: Thank You Email
Right after the session ends, send a thank you message. Use this email to:
Thank your client for choosing you
Let them know you enjoyed working with them
Remind them when to expect their gallery
This first touchpoint shows that you care and sets clear expectations.
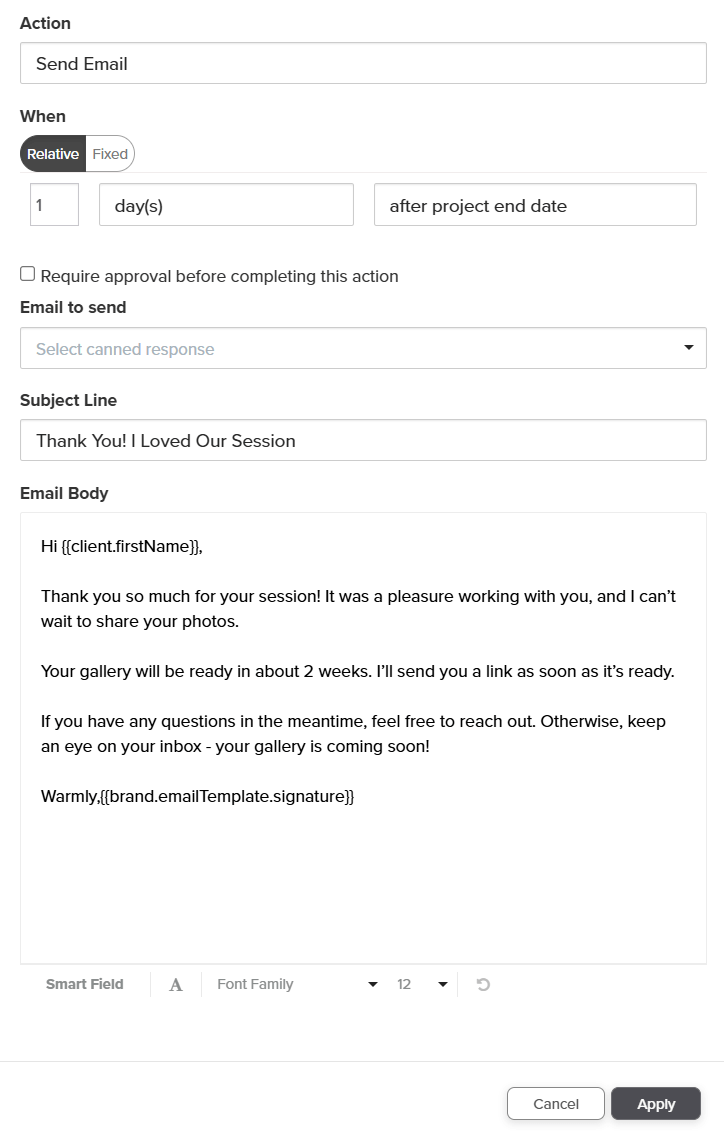
Send a thank you email after the session
Step 2: Deliver the Photo Gallery
Once the gallery is ready, send it through Dubsado using a simple email. You can link to your gallery platform (like Pic-Time or Pixieset).
You can add a to-do before this step so you remember to paste the correct gallery link into the email before it sends. That way, you can keep the workflow automated while still customizing the gallery delivery.
If you’re not sure how to add a gallery link using a to-do step, check out my blog post: How to Send Photo Galleries to Clients with Dubsado
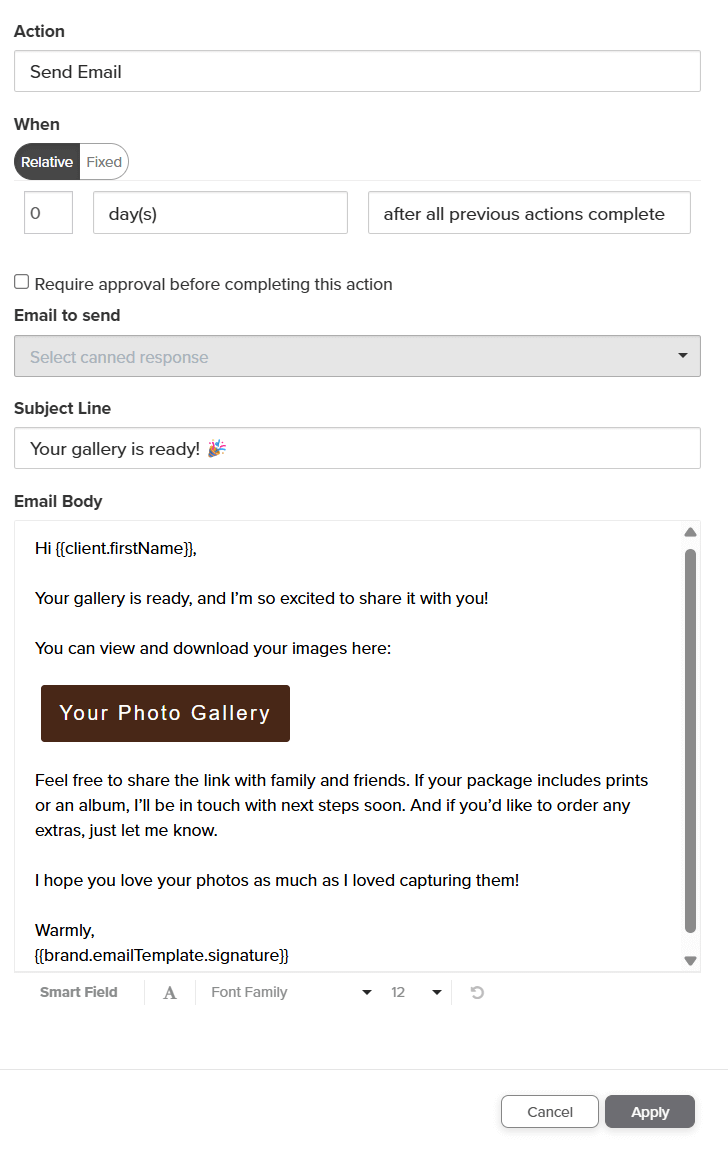
Send the photo gallery
Step 3: Request a Testimonial or Review
Use this step to ask your client for feedback. You can:
Send a Dubsado form to collect a testimonial
Share a Google Review link
Send them to a form built in Typeform, Airtable, or Google Forms if you prefer the responses to go into a spreadsheet or database
If you use a Dubsado form, you can also add a step in the workflow to send them a reminder if they don’t submit it within a few days. You can also automate a thank you email once they submit their feedback.
This small step can lead to more reviews that build trust with future clients.
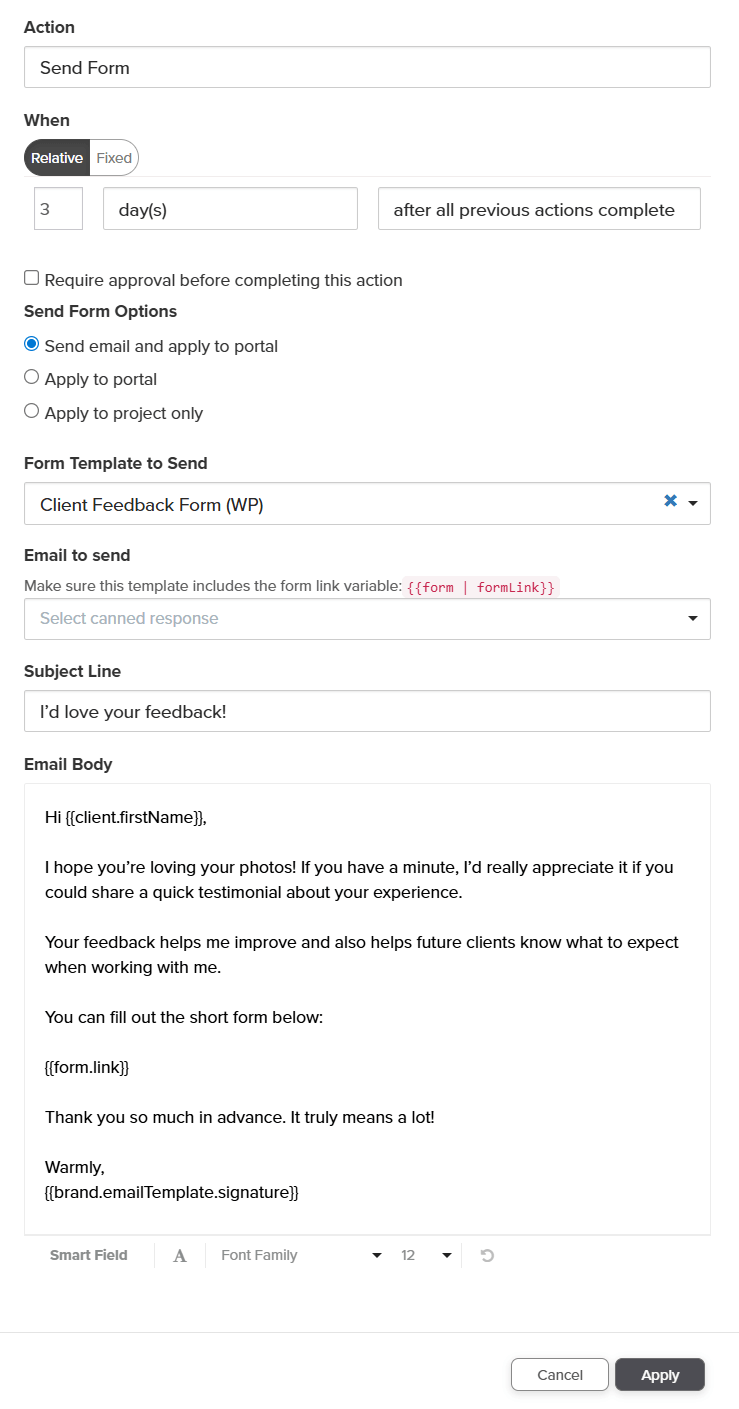
Ask for a testimonial or feedback
Step 4: Invite Them to Work with You Again
Once the gallery and testimonial are sent, you can follow up with an email that:
Offers a discount for future sessions
Shares seasonal mini session dates
Invites them to turn their photos into albums or prints by submitting a form where they can place an order
You don’t have to guess when to follow up. Dubsado can send this message for you, even months later. This allows you to stay top of mind with your past clients and can help increase your bookings.

Invite clients to work with you again - via albums, prints or other offers
How to Start a Post-Session Workflow in Dubsado
There are two ways to start your workflow: automatically or manually.
Option 1: Start Automatically
You can connect your post-session workflow to your main session workflow using the "Start a Workflow" action.
To do this:
Use “after appointment has ended” if your session was booked with a scheduler
Use “after project start date” if you manually set the session date.
Option 2: Start Manually
You can also start your post-session workflow manually. This works best if you want more control over the timing or if you have multiple post-session workflow options.
To start a workflow manually:
Go to the client’s project
Click on the “Workflows” tab
Choose your post-session workflow from the dropdown
Click “Apply”
That’s it. Your workflow will start running based on the steps you’ve added.
TL;DR
A post-session workflow in Dubsado helps you follow up with photography clients automatically after their session. You can:
Send a thank you email
Deliver their gallery
Ask for a testimonial or review
Share future offers or discounts
Invite them to order albums or prints
You can start the workflow manually or set it to begin automatically based on your session date.
Once it’s set up, the workflow saves you time, helps you stay on top of tasks, and gives you more time behind the camera.
For a full overview of how Dubsado works for photographers from inquiry to gallery delivery, read Dubsado for Photographers: The Complete Guide.
Walkthrough: Build your Post Session Workflow in Dubsado
Prefer to see the setup in action? I’ve created a step-by-step video showing you exactly how to build your post-session workflow in Dubsado.
Want Me to Build This for You?
If setting this up feels overwhelming or you’d rather focus on your photography, I can help.
I work with photographers to build complete Dubsado setups that cover everything from the first inquiry to the final follow-up.
If you want:
A system that follows up after every session
Custom workflows tailored to your business
Everything set up for you, the right way
Then let’s talk.
Book a free 20-minute discovery call to see if we’re a good fit and get expert support building your Dubsado setup.
