Automate your Wedding Timeline Creation

As a wedding planner, creating a detailed wedding timeline is key to a smooth and stress-free day for your clients. Normally, planners collect key information with a questionnaire and manually turn it into a timeline document. This process takes a lot of time and effort.
But what if you could automate it? By connecting Dubsado with Zapier, you can transfer client answers into a Google Docs template, automatically creating a personalized timeline. This saves you hours of manual work and creates a document that can be easily updated or refined later.
Why use Google Docs? Because once the document is created, you or your team can make last-minute edits or changes directly in the shared file. This is especially helpful as details shift in the lead-up to the big day. And it means you’re not locked into an email with the timeline information or a static PDF.
In this post, I’ll show you how to automate wedding timeline creation using Dubsado, Zapier, and Google Docs.
Step 1: Set Up Your Wedding Timeline Questionnaire in Dubsado
Start by creating a wedding timeline questionnaire in Dubsado. The questionnaire should cover all the key details for the timeline, such as:
Preparation location and start time (for both partners)
Ceremony location and start time
Reception location and start time
Important event details (first dance, cake cutting, speeches, etc.)
Contact details for key players (both partners, wedding party, etc.)
Vendor information (photographer, DJ, caterer, etc.)
Pro Tip: Zapier only works with short answer and date fields. Make sure your important information is in these formats, not dropdowns or checkboxes.
Tip: Make sure your questions are clear and detailed. This will make the process of creating your wedding timeline template much easier.

Example of Wedding Timeline Questions
Step 2: Set Up Custom Mapped Fields in Dubsado
To automate the wedding timeline creation, you’ll need custom project mapped fields in Dubsado for short answers and dates. These fields let Zapier pull the responses and insert them into your Google Docs template.
Here’s how to create custom project-mapped fields:
Go to your Dubsado settings (gear icon at the top right).
Click on "Custom-mapped fields" and select “Project”
Click "Create"
Name the mapped field (e.g., "Ceremony Start Time").
Choose the field type as "Short answer" or “Date”
Save it.
Repeat these steps for all the information you need in your timeline.

How to create a custom mapped field in Dubsado
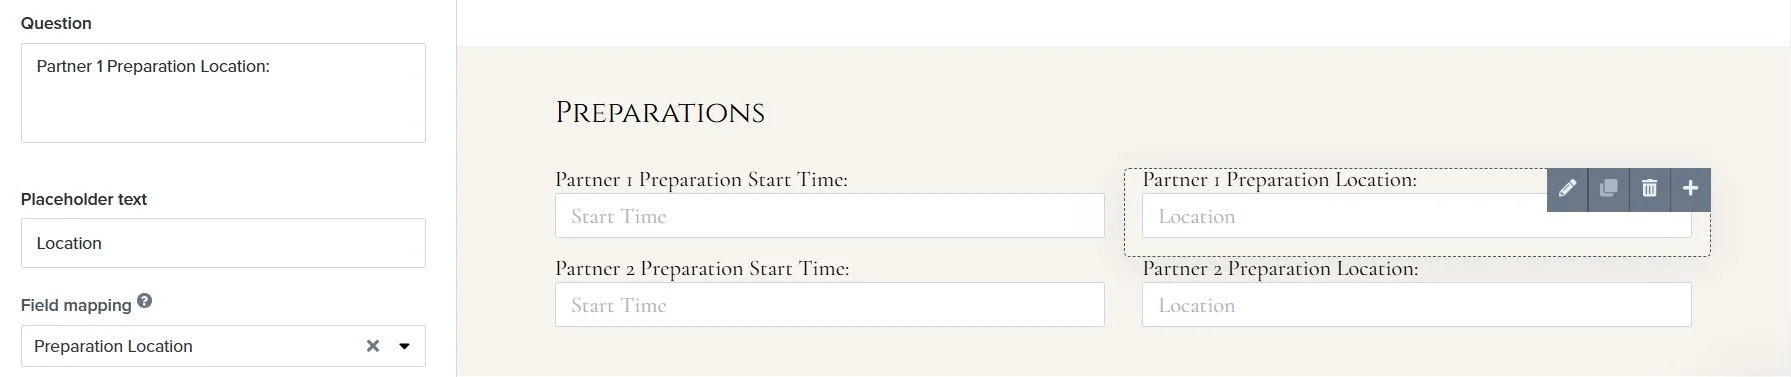
Step 3: Add Mapped Fields to the Questionnaire
Now link the fields in your wedding timeline questionnaire to the custom fields you just created.
Open the questionnaire in Dubsado and click on the short answer or date field.
In the settings, select "Field Mapping"
From the dropdown, choose the corresponding mapped field.
Save your form.
Make sure each answer is linked to the correct field.
Add the custom mapped fields to the questionnaire
Step 4: Create a Unique Project Status for Zapier
You’ll need a unique project status to trigger the Zap once the timeline questionnaire is done. Name it something like "Timeline Complete."
You can automate this step using Dubsado workflows. To do that add this step to your workflow that sends the questionnaire:
Action: Change Project Status
When: 0 day(s) after form is completed
Form to Watch: Timeline Questionnaire
Status for Project: Timeline Complete
Note: If you don’t want to use this status in Dubsado to view your projects, add a step in the workflow to change back to the original status an hour later to ensure the Zap runs.
Step 5: Create Your Wedding Timeline Template in Google Docs
Next, create a Google Docs template for your wedding timeline. This template should have placeholders inside curly brackets that will be filled with your client’s information from Dubsado.
Here’s a basic structure for your wedding timeline Google Doc template:
{{Wedding_Date}} - Wedding Timeline for {{Client1}} and {{Client2}}
{{Preparation_Start_Time}} - Preparations Begin for Both Partners
{{Client1}} arrives at {{Preparation_Location1}}
{{Client2}} arrives at {{Preparation_Location2}}
{{Ceremony_Start_Time}} - Ceremony
{{Ceremony_Location}}
{{Officiant_Name}} officiates the ceremony
{{Reception_Start_Time}} - Reception
{{Reception_Location}}
The placeholders (e.g., {{Wedding_Date}}, {{Client1}}, etc.) will be replaced with the client’s answers from Dubsado.
Tip: Keep the naming structure simple and avoid spaces or dashes inside the curly brackets. This will help Zapier read the fields correctly.
Once your template is ready, save it in Google Drive.

Example of Timeline in Google Doc with placeholder text
Step 6: Set Up the Zap in Zapier
Now it’s time to connect Dubsado and Google Docs with Zapier. First, make sure you’ve added Dubsado, Google Drive and Google Docs as apps in Zapier.
Follow these steps to set up your Zap:
Create a New Zap:
Click on ‘Create’ to start building a new Zap.
Set Dubsado as Your Trigger App:
Search for and select Dubsado as your trigger app.
Choose the trigger event as “Project Status Updated”. This will activate the zap when the project status changes.
Add a Filter:
App: Filter by Zapier
Only continue if: “Current Status” | (Text) Contains | Add keyword(s) from the project status that will differentiate it from all the other project status in your account - like “Timeline”
Find your Google Doc template in Google Drive
App: Google Drive
Action Event: Find a File
Account: Select your connected Google account
Filename: Type in the keyword(s) or exact title of your Google Doc timeline template
Search Type: Filename contains
Drive: Select your Drive
Folder: Find the folder where your template is located
Create a Copy of the Wedding Timeline Google Doc
App: Google Docs
Action Event: Create Document From Template
Template Document: (change to Custom by clicking on the 3 dots), Select step 3 (previous step), Click ID - this is so it pulls the document it found in the previous step of the Zap
New Document Name: Write the document name for your client. You can include dynamic data. You can call it “Wedding Timeline First Name: & Client Alt Contact First Name”. Use the + option to select client data from the Dubsado trigger.
Folder for new Document: select the location in your Google Drive for the new document
Sharing Preference: select the option that works best (anyone with link can view | edit | view/comment)
Fill in the information from the Mapped Google Doc Fields using dynamic data from Dubsado. For instance:
Client1: select First Name from Dubsado
Client2: select Client Alt Contact First Name from Dubsado
Note: once you click + you can use the search bar at the top to find the Custom Mapped Fields you created in Dubsado
Test Your Zap:
After mapping all fields, test the zap to ensure that the responses from the questionnaire correctly populate the Google Doc template.
If everything looks good, publish your Zap to start using it!

Wedding Timeline Zap
Automate and Save Time
Now, every time a client completes their wedding timeline questionnaire in Dubsado and the status changes to "Timeline Complete," Zapier will automatically create a wedding timeline in Google Docs. From there, you can review it, tweak the details, and share it with your team. All in one editable, collaborative document.
This method not only cuts down on manual work but also keeps you flexible. Since the timeline lives in Google Docs, it's easy for you or your team to make real-time changes as new information comes in. No re-downloading, no formatting headaches, no wasted time.
Automating this process saves you valuable time, reduces errors, and lets you focus on what matters: making your clients' weddings perfect.
Watch the Video: Automate your Wedding Timeline Creation
To give you a hands-on look at how to automate creating a wedding timeline, I’ve put together a video tutorial. In the video, I show you how to create your questionnaire in Dubsado, how to setup custom mapped fields, how to create your timeline document in Google Docs and how to setup a Zap to automate the entire process
TLDR: Simplify Your Wedding Timeline Creation
Wedding timelines are a critical part of your job as a wedding planner. Automate your wedding timeline creation with Dubsado, Zapier, and Google Docs. Set up custom fields in Dubsado, map them to a Google Docs template, and use Zapier to automatically transfer client responses into your timeline.
Save yourself hours of manual work, reduce errors, and create seamless timelines that you can share with your team with minimal effort. This will allow you to spend more time focusing on what matters most – making each wedding day unforgettable for your clients.
Check out the YouTube video tutorial in this post for a hands-on look at how to create a wedding timeline document.
Need Help Setting Up Dubsado?
If you need help in setting up Dubsado for your wedding planning business, I’d love to help!
👉 Book a free discovery call and let's talk about how I can streamline your processes and save you time.