How to Create and Send Invoices in Dubsado
By Ema Katiraee, Certified Dubsado Specialist
TL;DR: Dubsado invoices live inside client projects, connect to your package templates, and can be attached to proposals so clients can review, sign, and pay in one step. Here's how to set up your invoice settings, create and customize invoices, add payment plans, and send them.
Invoices in Dubsado do more than just collect payment. They connect to your packages, tie into payment plans, and can be bundled with your proposal and contract so the entire booking process happens in one place. Here's everything you need to know to set them up properly.
Invoice Settings in Dubsado
Before you create or send your first invoice, it’s important to review your invoice settings inside Dubsado. These settings control how you receive money, how invoices appear, and the options available to clients when they pay.
Connect Your Payment Processor
Dubsado connects with three payment processors: Stripe, Square, and PayPal. For help choosing and connecting one, see my guide on how to receive payment in Dubsado.
Enable Autopay
If clients are paying in installments or on recurring invoices, you can offer autopay once your payment processor is connected. This allows future payments to process automatically without the client having to manually pay each time.
Under Default autopay settings, click Edit autopay and select from the following options:
Disabled: autopay is turned off.
Optional: clients choose whether to enable autopay.
Required: clients must enroll in autopay to work with you.
For business owners who struggle with late payments, requiring autopay adds peace of mind that installments will process on schedule.
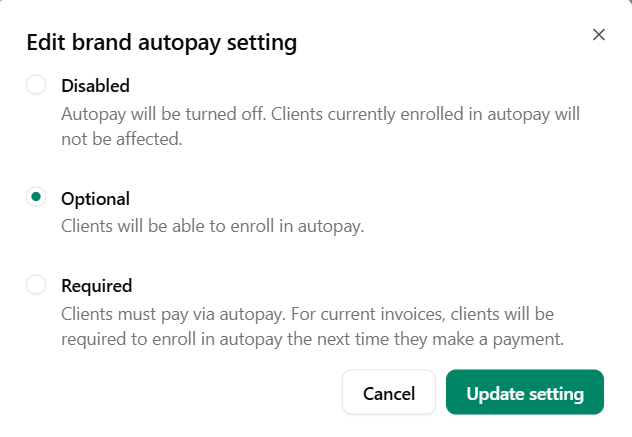
Brand autopay settings in Dubsado
Allow Gratuity
You can enable a gratuity option once your payment processor is connected, so clients can add a tip or extra payment when completing their invoice.
To accept tips, go to your Settings→ Payments → Toggle on under ‘Accept tips from clients at checkout’

Accept gratuity from clients
Customize Invoice Appearance
Under the Invoice Appearance tab in Dubsado’s settings, you can:
Choose how the Bill to information appears (client name, company name, or both).
Show or hide the Tax column for each line item in your invoices.
Add Invoice terms at the top or bottom of every invoice.
Invoice terms are especially helpful if you want to include:
Alternative payment instructions (like Venmo, Zelle, or e-transfer).
Your tax ID or business number.
Legal terms, refund policies, or late fees.
QR codes or direct links for off-platform payments.
Once saved, these terms will appear automatically on every invoice you send in Dubsado.
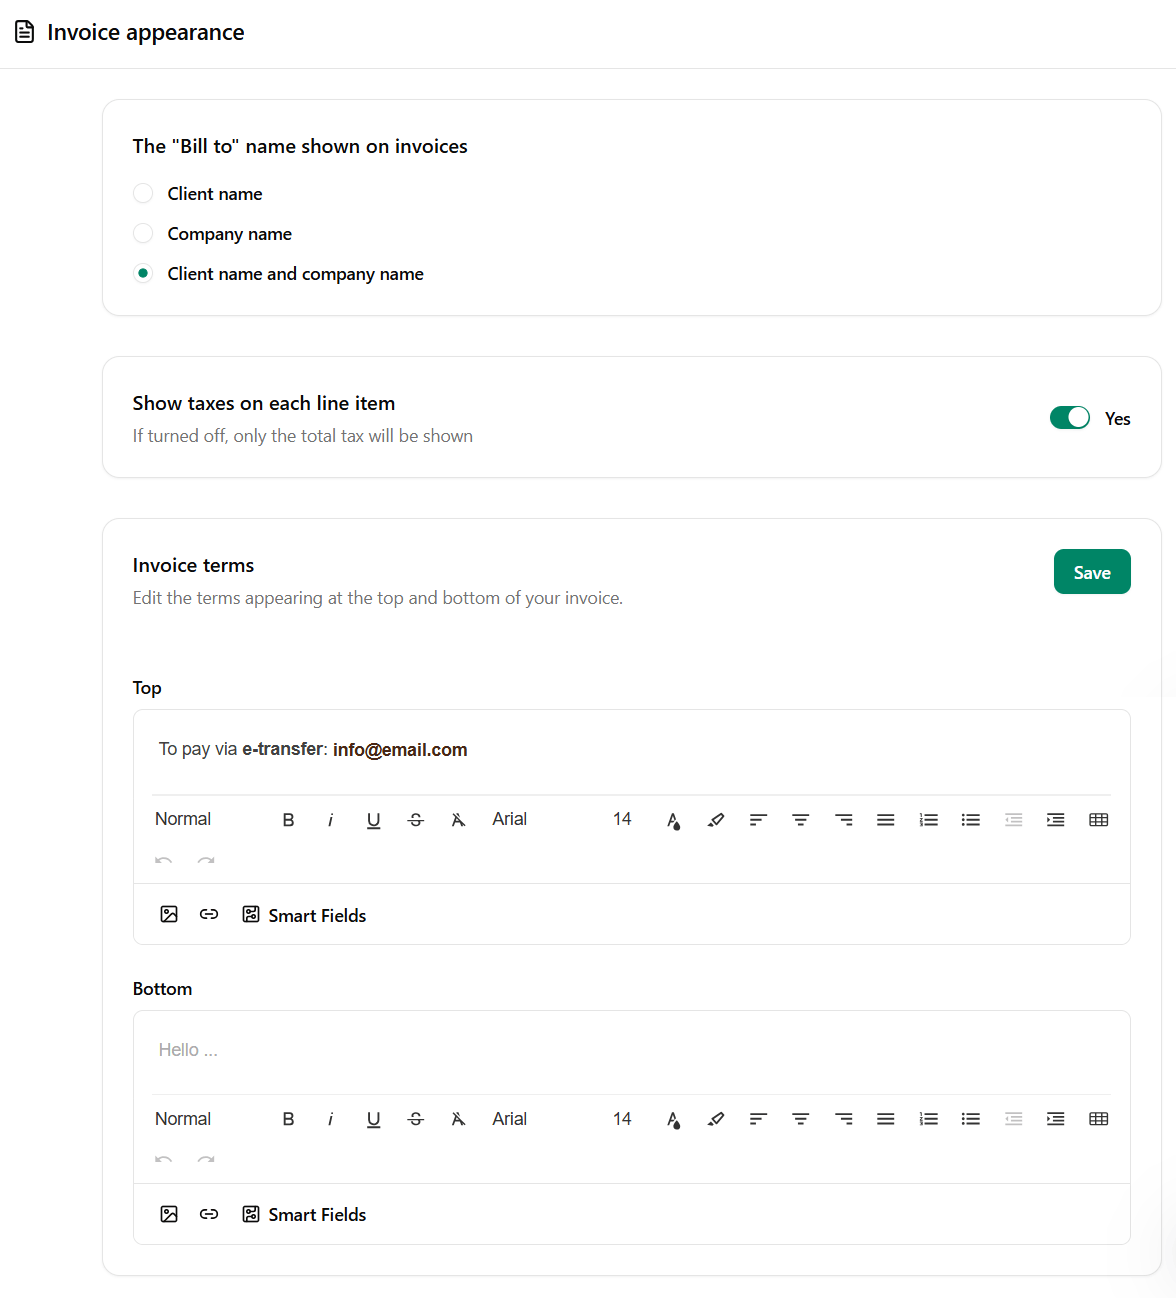
Invoice Appearance settings in Dubsado
Changing Invoice Numbers in Dubsado
By default, every new Dubsado invoice increases sequentially from the last used number. But you can edit an invoice number if you need to.
How to change an invoice number in Dusbado:
Open your client’s project.
Open the Invoicing tab.
Click the invoice you want to edit to open it.
Click the pencil icon next to the Invoice Number.
Enter your new invoice number.
Important notes:
Dubsado does not allow duplicates invoice numbers. If you try to use an invoice number that already exists, Dubsado will automatically adjust it to the next unused number available.
You can view all your existing invoices including all used invoice numbers under Invoicing → Invoices.
If you want all future invoices to start after a certain number, set your last created invoice to that number. Dubsado will then continue numbering from there.
This feature gives you flexibility if you want your invoices to match an existing numbering system in your business, or if you’re switching to Dubsado from another platform.
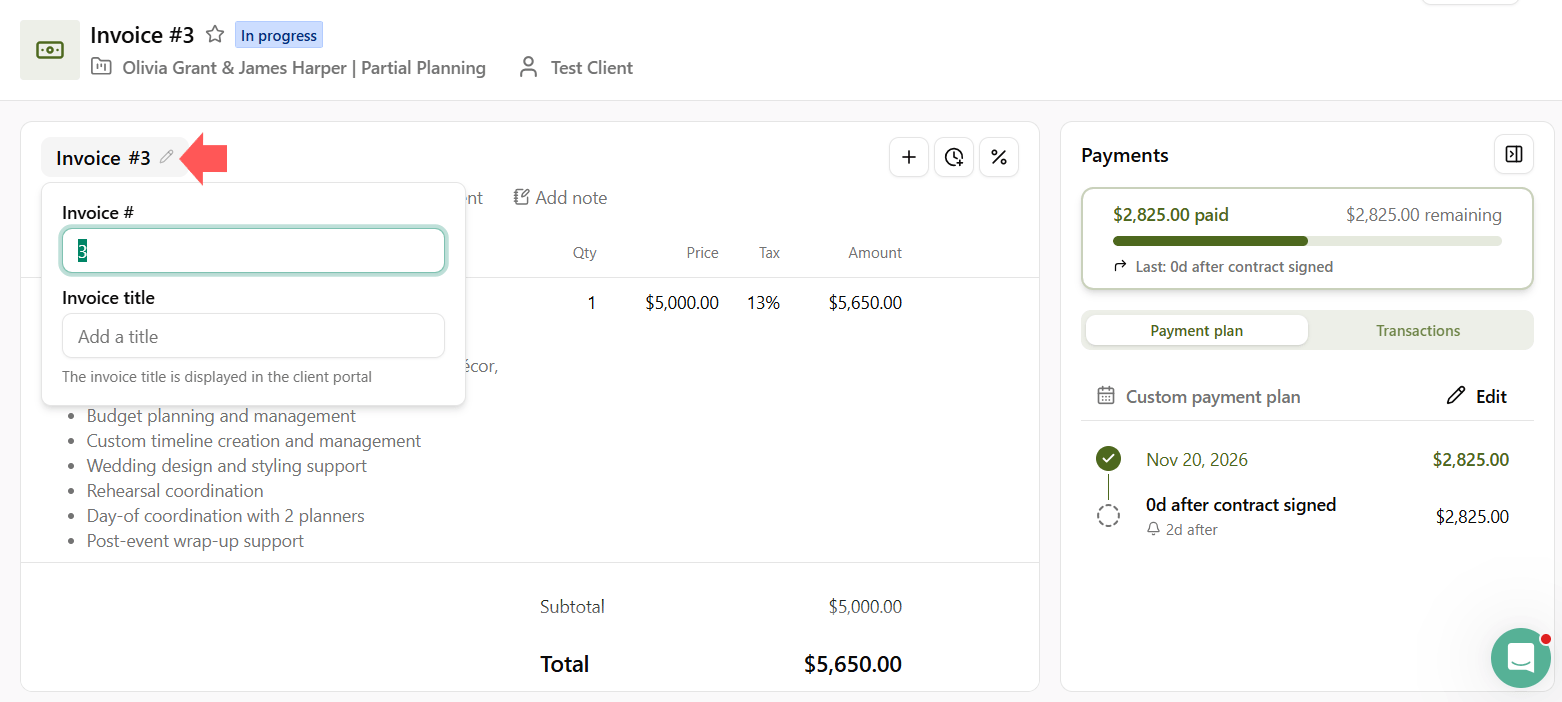
How to change the invoice number
How to Create a Custom Invoice in Dubsado
Here’s a step-by-step breakdown of how to create an invoice in Dubsado:
Open your client’s project.
Go to the Invoicing tab.
Click New Invoice to create a new invoice.
Dubsado will assign an invoice number and today’s date.
Select Packages from the dropdown menu to add from your pre-built package templates.
Click each element in the package (title, description, quantity, price, tax) to edit as needed.
Click Save Changes to lock in your changes.
The result is a fully customized Dubsado invoice that reflects the exact services you’re providing.
Adding a Payment Plan to your Invoice in Dubsado
One of Dubsado’s most powerful features is the ability to create payment plans tied to project milestones. You can either apply a saved plan or build one directly on the invoice.
Common payment plan due date options:
Contract signed: great for deposits or retainers.
Specific date: set a fixed calendar due date.
Project start or end date: ideal for initial or final payments.
Example:
First payment: due the day the contract is signed.
Second payment: due 60 days after the contract is signed.
Final payment: due the day the project starts (event date).
Once the contract is signed and project dates are set, Dubsado automatically fills in the actual due dates and arranges installments in order.
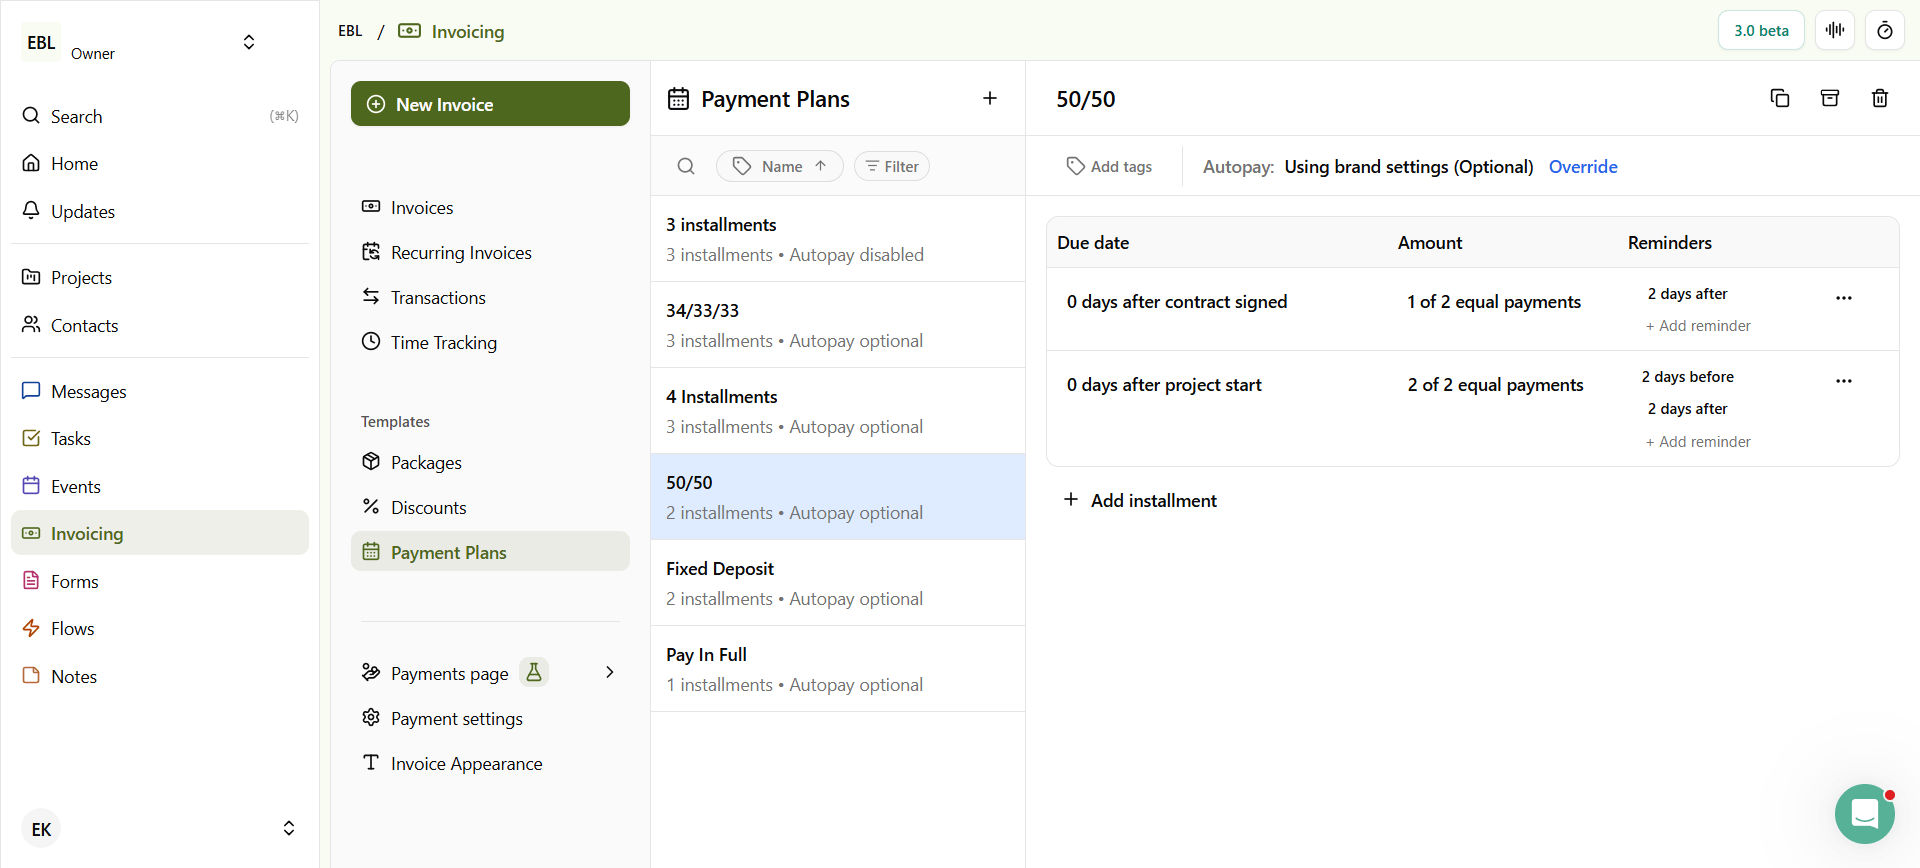
Payment plans in Dubsado
Payment Plan Reminders in Dubsado
Each payment plan installment can include automated reminders, such as:
Two days before the due date
The day of the due date
Three days after the due date
A helpful detail: once an installment is paid, future reminders for that payment gray out and will not send.
How to Send Invoices in Dubsado
Once your invoice is ready, you have two options to send it manually:
Send Manually
Go to the invoicing tab and click to open the invoice.
Click Share → Send.
In the pop-up window, select a canned email from your templates or write a custom message.
Click Send and your client will receive the invoice directly.
2. Attach a Custom Invoice to a Proposal
For a more seamless client experience, attach your custom invoice to a proposal:
Build your invoice first.
Use a 3-in-1 proposal (proposal + contract + invoice), and use invoice smart fields in the proposal instead of package smart fields.
When you send the proposal to your client, they can view their custom invoice inside the proposal, sign the contract, and pay the invoice in one seamless flow.
FAQ: Dubsado Invoices
Can I change the invoice number in Dubsado?
Yes. Click on the invoice number in the Invoices tab of a project, type in a new number, and save. Dubsado won’t allow duplicate invoice numbers - if you try to reuse one, it will automatically assign the next available number.
Do I have to use package templates to create an invoice in Dubsado?
No. While package templates make it faster to build invoices, you can also add line items manually and edit prices, quantities, and taxes for each client.
What happens to reminders once a client pays an installment?
As soon as an installment is marked as paid, future reminders for that payment automatically gray out and will not send.
Can I set my own payment terms or add alternate payment methods?
Yes. Under invoice settings, you can add custom terms to the top or bottom of every invoice. Many business owners use this to include e-transfer details, Venmo handles, tax IDs, refund policies, or late fee policies.
What if I want clients to sign a contract and pay all at once?
Use a 3-in-1 proposal (proposal + contract + invoice). This allows your clients to review their custom invoice in the proposal, sign the contract, and pay the invoice inside one document / link.
Tutorial: How to Create Invoices in Dubsado
Prefer to see the process in action? Watch my full walkthrough on how to create and send invoices in Dubsado step by step:
Still Piecing Your Invoicing Together Manually?
If your payment process has more manual steps than it should, that's usually a sign the broader setup needs attention. Book a discovery call and let's talk about building an invoicing and workflow system that actually runs itself.
