Dubsado Proposals 101: Everything You Need to Know to Book Clients Faster

By Ema Katiraee, Certified Dubsado Specialist
If you've been using Dubsado for a while, you've probably heard people raving about proposals. And honestly? The hype is warranted.
Out of all the features Dubsado offers, proposals are one of my absolute favorites - and they're one of the first things I set up for every single client. When done well, a Dubsado proposal does a lot of the heavy lifting in your booking process, so you're not constantly chasing people down or answering the same questions over and over.
In this post, I'm breaking down exactly what Dubsado proposals are, what to include in yours, how to set up a 3-in-1 proposal, and when a public proposal might make sense for your business.
If you're brand new to Dubsado, start here first: what Dubsado is and how it works for service-based businesses.
Disclosure: This post contains affiliate links, which means I may earn a commission if you click through and make a purchase. This comes at no additional cost to you.
What Is a Dubsado Proposal?
A Dubsado proposal is a form that lets your potential clients browse your packages and select the one that fits their needs. Think of it like a mini sales page combined with a shopping cart - all inside your Dubsado account.
But what makes it genuinely powerful is what you can attach to it: a contract and an invoice. That combination turns a simple proposal into a complete booking experience, which I'll get into more below.
What to Include in a Dubsado Proposal
Here's the thing about proposals - they're not just a list of your prices. They're a sales tool. If you've ever built a sales page before, the structure is very similar. The goal is to help your potential client feel confident enough to click "submit."
Here's a structure that works well for most service-based businesses:
Header / Logo: your branding, front and center
Welcome: a short, warm introduction
About Me: a brief bio about you and how you help clients
Your Process: the key steps you take clients through
Packages: the services your client can choose from
Add-On Packages: optional extras they can add on
Testimonials: social proof from past clients
FAQs: answers to the questions you get asked most often; this goes a long way in reducing hesitation
Client Information: fields to collect their name, email, phone number, start date, etc.
Next steps: a clear explanation of what happens after they hit submit
Thank you / Footer
The FAQ and testimonials sections are two I'd never skip.
For photographers and wedding planners especially, clients often have a lot of questions before they're ready to commit - having those answers right in the proposal means fewer back-and-forth emails and faster decisions on their end.
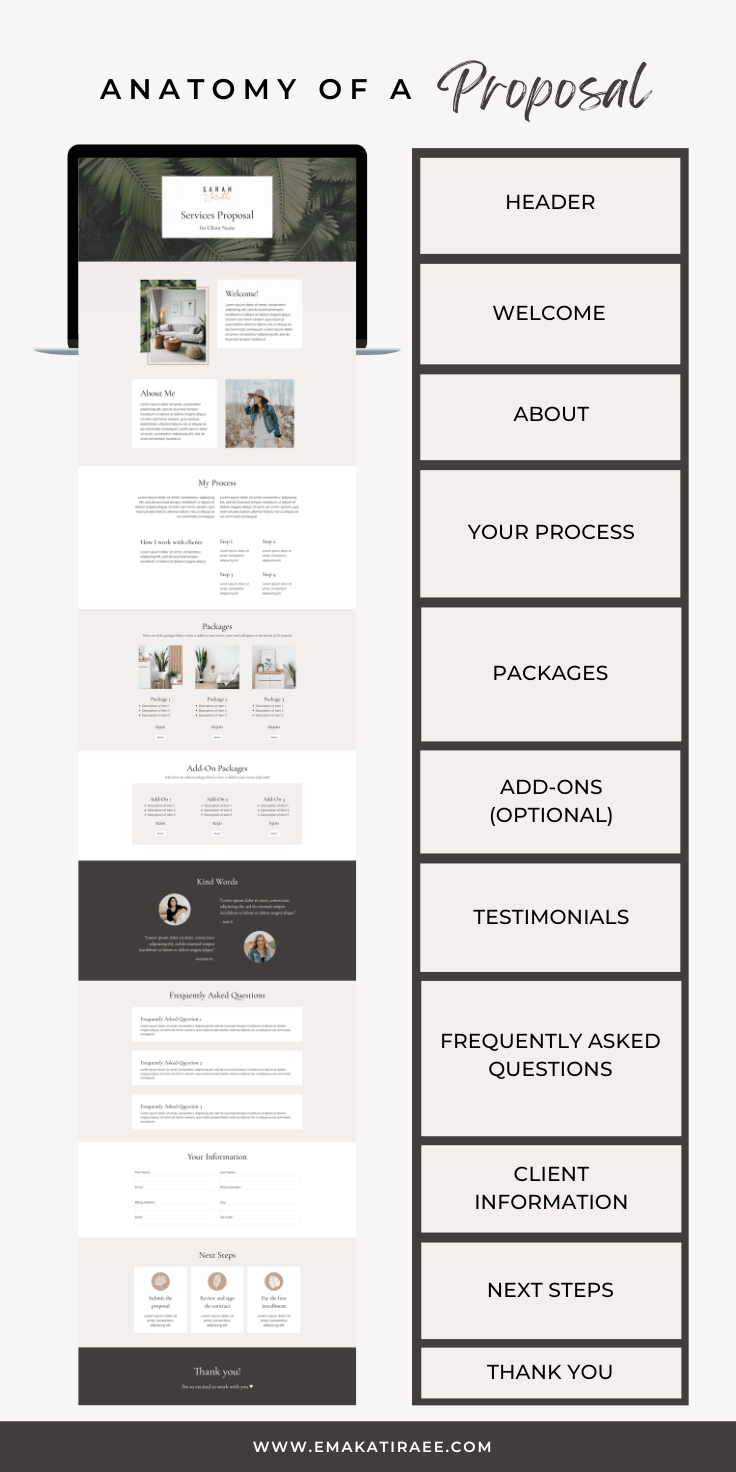
The Anatomy of a Proposal in Dubsado
What Are 3-in-1 Proposals in Dubsado?
A 3-in-1 proposal is a Dubsado proposal that has both a contract and an invoice attached to it. Your client moves through all three steps without ever leaving the page - it's a seamless, tab-by-tab experience:
They review the proposal and select a package.
They read and sign the contract.
They pay the invoice.
That's it. No separate emails, no follow-up links, no "did you get the contract I sent?" messages. They go from interested lead to paying client in one sitting.
This is the setup I recommend for the majority of my clients. It speeds up that initial onboarding phase significantly, and it means you're not leaving money on the table because someone got busy between receiving the contract and finding the invoice link.
How to Set Up a 3-in-1 Proposal in Dubsado
To attach a contract and invoice to your proposal, head to your form settings:
Toggle on ‘Include Contract’ and select the contract that matches the services in your proposal from the dropdown.
Toggle on ‘Include Invoice’ and select a payment plan if applicable.
Note: You'll need your payment processor connected before clients can pay through the invoice. You can set that up under Settings > Receive Money.

Toggle on contract and invoice to create a 3-in-1 proposal in Dubsado
Want to see the full build process - layout, packages, add-ons, and form settings - step by step? Watch the video below.
Public Proposals: When and Why to Use Them
Public proposals take things one step further. Instead of sending a proposal to a specific lead inside a project, a public proposal can be embedded directly on your website or shared via a direct link - so clients can sign up to work with you entirely on their own, without needing a call first.
Once a client completes a public proposal, Dubsado automatically creates a new project for them. From there, you can trigger a workflow to send them a questionnaire, a scheduler to book their first session, or whatever your next onboarding step looks like.
This works particularly well for photographers offering straightforward packages where clients don't need a discovery call to make a decision. Wedding planners with more complex scopes might still prefer the traditional route of sending proposals within a project after an initial call.
How to Set Up a Public Proposal
In your form settings:
Toggle on ‘Create new project once proposal is completed’.
Assign a default workflow, a project status, and a project title - you can use Smart Fields here to pull in your client's name automatically.
Add a redirect URL if you want clients to land on a specific page on your website after submitting.
Note that if you're using a redirect URL, you won't be able to have the contract and invoice attached. You'll want to trigger those through a workflow instead.

Toggle on the button to turn your proposal into a public proposal
How to Share a Public Proposal
Once your proposal is set to public, the Share menu in the form will become active. From there you have two options:
Embed Code: click the embed code to copy it. Paste it into a code block on your website so the proposal loads directly on your site.
Direct link: click the direct link to copy and share anywhere - via email, a link in your Instagram bio, a button on your website, etc.

Link or embed code to share a Dubsado Public Proposal
Should You Use a Proposal Template?
If you want to give your proposal a more polished, on-brand look, templates are a great option. There are two types:
No code template use images (often designed in Canva) that you upload directly into Dubsado. They're straightforward to set up, but if you need to update your content, you'll have to go back into Canva, edit, and re-upload.
CSS code template give you more flexibility. You can customize fonts, button colours, add timelines, dropdown menus, and more. The tradeoff is that there's more of a learning curve upfront, and any tweaks require editing the CSS.
Either way, I'd recommend keeping the design consistent with your existing branding and resisting the urge to overdo it. The goal of your proposal isn't to show off every design feature - it's to clearly communicate your offer and make it easy for someone to say yes.
FAQ
Do I need to use a proposal in Dubsado?
You don't have to, but it's one of the most effective ways to streamline your booking process. Without a proposal, you're manually sending contracts and invoices separately, which means more emails, more follow-ups, and more room for things to fall through the cracks.
Can I send a proposal without a contract or invoice attached?
Yes. The contract and invoice are optional - you can use a standalone proposal if you prefer to send those separately. That said, the 3-in-1 setup is usually more efficient for both you and your clients.
What's the difference between a regular proposal and a public proposal?
A regular proposal is sent manually inside a specific project to a lead you're already in contact with. A public proposal can be shared publicly - embedded on your website or sent via a direct link - and creates a new Dubsado project automatically when submitted.
Do I need to rebuild my proposal every time I send it?
Nope. Once your proposal template is set up, Dubsado pulls it into each project automatically (or sends it through a workflow). You can personalize it per client before sending if you want, but the core setup stays intact.
Can I customize a proposal before sending it to a specific client?
Yes. Once a proposal is added to a project, you can edit it before hitting send. That might mean adjusting which packages are shown, or pre-selecting a package based on your conversation.
What if I need to send a custom quote instead of set packages?
Dubsado supports this too. Instead of using package elements in your proposal, you can add items directly to the client's invoice first, then display that invoice inside the proposal using smart fields. This is called a quote-like proposal, and it works well when you're offering something highly tailored to one specific client. To learn more you can check out this post: Dubsado Package Proposals vs Quote-Like Proposals.
TL;DR
A Dubsado proposal lets clients select a package, sign a contract, and pay an invoice all in one place.
Think of it like a personalized sales page - include your process, packages, testimonials, and FAQs.
A 3-in-1 proposal (with contract + invoice attached) is the setup I recommend for most service providers.
Public proposals can be embedded on your website for a "buy now" experience - great for photographers with simple package structures.
Templates (no-code or CSS) can help elevate the look, but keep the design simple and on-brand.
Sign up for Dubsado
If you're not on Dubsado yet, use my code EMAKATIRAEE to save 30% on your first month or year.
How does your client experience actually measure up?
Wondering if your client experience is actually working the way it should? Take the free quiz to find out where things stand and what to do about it.
Ready to Hand This Off?
If reading this made you realize your proposal setup needs work - or that you'd just rather have someone do it for you - that's exactly what I help with.
I work with photographers , wedding planners, and other service based business owners, to build out their full Dubsado setup so their client experience is smooth, professional, and actually works for them. The first step is a free 20-minute discovery call where we talk through where things are at and whether we'd be a good fit to work together.
